DPA Magazine
Kids in Snow
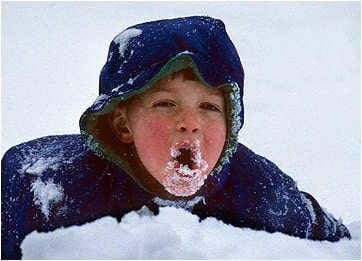
Kids In Snow by Russ Burden Wonderful Additions to the Family Album Birthday parties, family get-togethers, parades, kids on Halloween, weddings, graduations, cutting down a Christmas tree - these are but a few of the many events that make photography fun and rewarding. These preserved moments make for wonderful additions to the family album. Everyone has events that are special to them that make them run to a camera to capture the unfolding action. One of these for me is photographing my son when he’s playing in the snow. The following are some tips for capturing great shots of kids in snow. LET KIDS BE THEMSELVES: Try not to direct the action in that the spontaneous moment provides a better image. With this in mind, keep the camera up to your eye at all times to be ready to capture the fleeting moment. I acknowledge the fact that this may become tedious, but when you “nail it,” you’ll forget about the difficulties you endured. EXPOSURE COMPENSATION: Camera meters are calibrated to make all tones in an image have the same reflectivity as light gray. This means turning a beautiful field of white snow into a dull lackluster area of flat gray tones. In order to reproduce the snow as white, you’ll need to trick the camera’s meter to overexpose the film. Depending upon how much snow fills the frame and how bright it is, you’ll need to bias your exposure toward the plus side anywhere from one half to two stops. If the snow dominates the scene and it’s strongly lit by the sun, lean towards plus two stops. If there’s snow but also a lot of other elements that are not white, the plus one half stop should be fine. EXPERIMENT: Kids + Snow = Action! With this in mind, use techniques that portray motion. My favorite is panning the camera with the movement of the kids. If the action is very fast, start your experimenting with one sixtieth of a second. If it slows down, one fifteenth or even one eighth may produce more of a streaked background. Follow the action through after clicking the shutter as it will create a smoother effect. To learn more about this topic, join me on one of my Photographic Nature Tours. Visit www.russburdenphotography.com and click on the NATURE TOURS button for more information. Also, pick up a copy of my new book, Amphoto’s Complete Book of Photography. You can purchase a signed copy directly from me or visit your local book store or Amazon. Contact me at rburden@ecentral.com to order your signed copy. Photos & text © Russ Burden, Denver DPA Instructor
Lighting from Above

The light was coming in through the french doors above their head. I used a couple 2′x 3′ pieces of white foamcore board at their feet to bounce some of the light back on them. We had them on the blanket on the floor so that I could use a longer lens that would keep them looking proportionate. 1/125s f/4.0 at 1000 ISO Image and text © Fred Greaves, San Diego DPA Instructor
The Right Location + Time of Day = Success
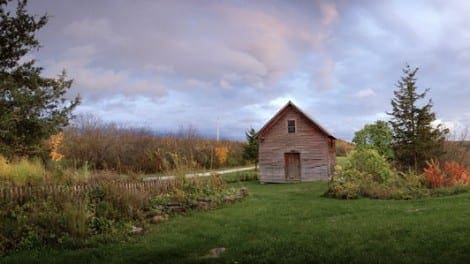
This landscape photograph was taken late in the day. I was driving to Vermont to visit friends and saw the sky becoming more and more colorful. I knew that their farm was picturesque and wanted to get there before the colors faded, so, without speeding, I made a beeline for their home. It helps to have a location in mind, and then wait for the right time of day. Early in the morning and late day skies can be incredibly colorful and dramatic, but they don′t last long, so make sure your camera is ready to go. Have an extra charged battery on hand. Choose an exposure ahead of time that is in the right range, since, when the light is right, you want to be concentrating on your composition, not trying to find the ISO button. A tripod is very handy in low light situations. Then, take the time to look around, the best shot may be behind you!
A MONUMENTAL CAMERA – Putting the Panasonic TZ3 Through Its Paces in Monument Valley
A) Just because you use a point and shoot doesn′t mean you can′t use a polarizing filter. Compare the differences between the image shot without it and then with it. Simply place the filter in front of the lens and rotate it until the sky and colors are more saturated. It′s better if you work with the camera on a tripod to do this. Without the Polarizer With the Polarizer B) Exploit the wide zoom range of the TZ3. Shoot at the wide setting to include everything to show the environmental shot and then zoom in to show the details. Wide Angle setting Telephoto setting C) Just because it′s dark, you don′t have to use the flash. Compare the two images of the campfire. The second one where I turned the flash off has much greater mood and color saturation. Flash on Automatic Flash turned off photo #1 Flash turned off photo #2 D) Use the flash Set to Slow Synch to pick up detail in areas that would otherwise not be revealed due to the short exposure of just the flash. At slow synch, the shutter remains open for a longer period of time to record more natural or ambient light. E) Set the TZ3 to Landscape mode in the Scene menu and fire away. Just have fun and enjoy the camera as you accumulate many great images of your trip. Notice the great natural colors that are recorded at sunset! Include clouds in the image to give the sky more drama Use natural features to create a frame around your subject Use that polarizing filter to add punch and more vibrant color to your photos. Vary your compositions by shooting both horizontals and verticals. All images © Russ Burden, Denver DPA Instructor
A CAPITAL IDEA – Putting the Panasonic TZ3 Through Its Paces in Capital Reef National Park

The Panasonic TZ3 is an extremely versatile camera. It can handle everything from the grand scenic to the casual portrait to revealing detail in close ups to being able to capture wildlife. Use the TZ3 to create a grand scenic. I used a polarizing filter in front of the lens to saturate the blue sky and take the glare off the fall color. Notice how rich in tone the TZ3 captures the reds of the formations. Try setting the camera to its Vivid mode in the menu to help saturate landscapes. The TZ3 works wonders in being able to separate tonality in diverse colors. When shooting scenics, use depth by including a foreground element to make the image 3 dimensional. Notice how the sunset colors come alive. This is a great time of day to photograph scenics. This scenic of Chimney Rock was made just before the sun sank below the horizon. Sunset and sunrise are great times to create scenics. Including people in your scenics works well to create a sense of scale. It also helps when they wear red! When photographing animals in the wild, wait for them to do something interesting or funny. The image will have a lot more impact than a shot of an animal just standing where it is. If you′re lucky and patient, you may come across something like this. Work fast and try to anticipate what will happen before it does. Use your wide angle setting to create a unique perspective. Use balance to fill the frame with individual compositional elements. Look for situations with interesting light. Notice how the basin is NOT placed in the center of the image.
An Approach to Subject Matter and Composition
I frequently think of the camera as a sketchbook that allows me to practice compositional strategies and sharpen my awareness of how to organize space within the frame. When those moments in life that really matter occur — personally or professionally — I must have my camera ready, in addition to the lessons of how “studies” like these inform my approach to image composition. So when I happened upon this scene during a walk about on the grounds of the abandoned Delaware copper mine in Michigan’s Upper Peninsula, I had to bring the Lumix L-1 up to it. The mid-nineteenth century structure has been in a ruined state for several decades, and so the tree growth present within its walls presented this stunning juxtaposition of natural world growth and industrial ruins. This scene compelled me to stop and study it for several minutes, and I proceeded to make fourteen different exposures of with the Panasonic Lumix L-1, with its RAW file format selected. Here’s why: Organizing Space The intuitive side of me saw order and possibility, and the thinking side of me immediately revealed a few keywords; “I see proximity, similarity, and closure here.” The proximity of the red brickwork window/door frames in the background becomes a group of information, which is easy to unify to the arched brickwork in the foreground. The similarity in the stonework in the foreground and the background provides strong unification by itself, but the fact that the bark of the birch trees are similar — in color and general design — makes the scene more intriguing. Finally, because the window frame visually cuts the top and bottom of each tree off, the viewer’s mind completes the rest of the information — this is called closure. If part of an object is subtracted, but still has enough information to be identified, then the viewer’s mind can mentally complete what is missing. It’s an effective technique, because the viewer doesn’t need to see an entire tree to understand what it is. Shooting Strategy Many people are bewildered when I tell them I shoot so many frames of a particular scene. A good habit of photography is providing choices from which to edit when returning home. Each exposure has a subtle correction of point of view, lens focal length, a tilt of the tripod needs correcting, etc. These comparisons, in the editing stage of a photograph’s life are what help the photographer determine the best rendering of the situation. I ended up choosing a frame with both the foreground and background sharp, which required f/16 to obtain this particular depth-of-field. I created other versions with selective focus and shallow depth-of-field with a wide aperture setting, like f/4 — some with the foreground sharp, some with it out of focus and soft — but in the end those don’t have the same visual impact. The Lumix L-1, by the way, handles much like my traditional film cameras do, with an aperture ring mounted on the lens, and a shutter speed dial mounted on the body. I really enjoy that. Think of your camera as a high-tech sketchbook, and the really meaningful photographic moments that unfold in the future can benefit, because you did some prep work. Be ready for what can appear around the next bend on a walk, and what some hindsight thinking during the editing stage can reveal. Thinking one, or two steps ahead in the process can make a significant difference in the quality of the images made. When you’re lucky, be ready. Images and Text © Don Werthmann, Detroit DPA Instructor
Pictures on your Day Off
I took these photos while working for an architect who specializes in exotic coastal homes in the Carmel / Big Sur, California area. They were not part of the assignment, but the area is so beautiful that it was hard to resist taking photographs on my one day off. I vividly remembered an area that I had photographed many years before while studying with the legendary Ansel Adams. To the surprise of others, I continued to pack my photo gear despite the heavy fog and light rain. I knew that the tonal range of the white sea-foam and the dark water-saturated rock was hard to capture (that’s one reason why Ansel invented the Zone system). As good luck would have it, the drizzle stopped and the fog pulled back, leaving a soft even canopy of cloud light – the perfect illuminant for capturing a long tonal range. I chose a diagonal composition that would add energy to the frame and captured the costal rock photograph. When the sun finally broke through the cloud cover, I rushed the back to a scene I had noticed earlier. At first viewing the light had been too flat and the scene was lifeless, but the potential was there. Now the scene was bathed in a soft raking light. I balanced the path on the left with highlighted rock on the right edge of the frame and captured the photograph.
Winter Photography Tips
Winter Photography Tips by Allen BirnbachWhen shooting in the cold, be sure to follow these tips on clothing, equipment, exposure, timing, and lighting. Winter can be one of the best times to shoot outdoors, and the key to a successful shoot is being properly prepared. Here’s what you need to know. Clothing: The key here is to dress in layers, wearing fabrics that will wick moisture away from the body (simply put, no cotton). The concept of layering is that you can dress on the light side when you are exerting your hiking into a location and raising your temperature, but have more layers to add once you are just standing around waiting for the perfect light. I generally start with a polypro turtleneck, a fleece vest or jacket on top of that, then a water and windproof shell as the outer layer. Bottoms are again layered, first with polypro tights, then fleece, then a pair of waterproof pants. Venting zippers on the jacket and pants are valuable for regulating body temperature, Hats are an important defense against losing body heat, and I have a range of hats and headbands available for different weather conditions, including a down face mask for the extreme situations. © 2007 Allen Birnbach Interestingly, I’ve found the key to staying warm is to make sure my feet stay warm. Depending on the temperature and depth of snow, I would at least wear a pair of waterproof hiking shoes with wool or fleece socks. When it gets colder, I’ll move to boots that have wool or synthetic liners. And on really cold days, I’ll go to “Mickey Mouse” boots that have a layer of air between the footbed and the exterior . When the snow depth gets to be an issue, I’ll couple any of these boots with gaiters to keep the snow from getting in between the boots and pants. Next is dealing with your hands, and again I suggest having multiple solutions. At a minimum, I’ll use a thin pair of polypro glove liners with sticky lines or dots to maintain good tactile ability. From there, I might layer a pair of fingerless fleece gloves on top of them. Next might be a waterproof shell if it is snowing. Another option would be fleece mittens with flaps that open back to fingerless gloves below. The last two items that are critical for shooting in the snow are sunscreen and sunglasses. Snow will reflect the light back into your face, and it is easy to get sunburned in a short amount of time. But it’s not only your skiing to be concerned about. Early on, I did an assignment for a ski resort, shooting most of the day facing into the sun while I skied backward capturing the action. The next day I could barely open my eyes. Now I shoot with glacier glasses, and as odd as it seems, it is well worth it for the protection they give. Equipment: Probably the most important issue, especially now with digital cameras, is battery power. Cold weather saps the energy of batteries, so be sure to have backups with you. I generally keep these in pockets close to my body so they stay warm. Hand warmers, available at sporting goods stores, can be valuable here as well. If it is really cold, I may tuck my camera inside my coat to keep it warm as well. Be prepared to protect your camera and accessories from weather. There are some great rain hoods and waterproof casings out there, but you can also use baggies to keep things dry. They’re also valuable in keeping condensation off your gear when you bring it inside. But keep in mind that condensation forms on the outer most layer, so if you have your equipment inside a camera bag or backpack, that would not be an issue. © 2007 Allen Birnbach A microfiber cleaning cloth or chamois is always good to have to keep things dry. And if it’s snowing, and I have the room, I’ll even carry a small umbrella so there is some distance between the lens and the first flakes of snow captured in the image. One thought is to work with a waterproof camera in snowy situations. There are several point-and-shoot models out there, and they take the worry out of winter shooting as long as you are not planning on large blow ups from the images you create. If you are shooting close to sunrise or sunset, you’ll probably want a tripod along with you. My recommendation would be to use one made of carbon fiber for two reasons. First, they are lighter, and equally important, do not suck the heat out of your hands when you are working with them. © 2007 Allen Birnbach Finally, a good backpack is helpful for carrying your gear, extra clothing, water and snacks. A backpack cover gives even more protection in keeping things dry, so those are recommended as well. So, now that we are ready, what are some of the tips for shooting in winter? Here are the three key things to remember. Watch your exposure: All light meters give you an exposure that would place whatever is covered by it as 18% grey. If you were to shoot a white card and a black card, the exposure for each would be exactly the same--mid grey. Try it sometime. How does that affect our shooting in winter? If you shoot a scene that is a mix of sky, trees and snow, maybe not that much, since you have a combination of light and dark values. But if the scene is all snow, the exposure will be underexposed significantly. The solution is to use the exposure compensation feature of your camera. If you are shooting with film, you can start with a minus one stop setting and bracket a stop in each direction. If you are shooting with a digital camera, simply check your histogram to make sure the highlights don’t blow out. Experience will help guide you once you’ve done this a bit. Watch your timing: Because light bounces off snow, shadows fill in quickly. So if you are shooting mid-day, the light is going to look uninteresting. The best time to shoot a landscape would be early or late, when the light is low, and there are nice shadows to give the image contrast. Another good time to shoot landscapes is before sunrise and after sunset, when the light wraps around objects without harsh shadows. You can even play with color to give the sense of coldness by using tungsten based film or adjusting your white balance (for digital cameras). Watch your light: If you are shooting a landscape that includes snow, look for angles that will show the texture. Shooting so that the sun is coming in from one side of the frame or the other would help, as would shooting with backlighting. And if you are shooting portraits, best to position them so they are backlit so that they will not have dark eye sockets. © 2007 Allen Birnbach
Como Park Conservatory: Flowers
These flower photographs were taken at the Como Park Conservatory in Minneapolis, MN by our DPA Instructor Tony Schreck. Remember that all DPA instructors and classes will teach these photo techniques whether you own a Panasonic or any other kind of camera. Tip #1 Use the sun to side light or back light to make the vegetation seem to glow: This image was shot with a panasonic Lumix L1at 1/125 s - f/1, with the Lumix-Leica 14-50mm lens at 50mm. I shot in manual mode to compensate my exposure to make the water look black. I also had the meter in center-weighted mode so I could meter off the lilly pad then the water, adjust my exposure and recompose. I wanted to emphasize the red veins on the lip, so I placed it running diagonally through the frame to give it emphasis. The lip is also backlit to make it glow giving it additional prominence. (Remember that all DPA instructors and classes will teach these photo techniques whether you own a Panasonic or any other kind of camera.)Tip #2 Use a low angle to to make the most of reflective surfaces such as water: In this Image I set the Lumix L1 to manual with center-weighted metering and exposed at 1/60 s - f/11. Lens: Lumix-Leica 14-50mm set to 50mm. (Remember that all DPA instructors and classes will teach these photo techniques whether you own a Panasonic or any other kind of camera.) Tip #3 Zoom in. Use your lens in telephoto to shorten depth of field and to compress distant objects: Lumix L1 1/60s at f/11. Lumix-Leica 14-50mm set to 50mm close to flower. (Remember that all DPA instructors and classes will teach these photo techniques whether you own a Panasonic or any other kind of camera.) Tip #4 use a wide aperture (f/3.5 here) to isolate the object you want primary emphasis on: Lumix L1 1/500th of a second at f/3.5 with the lumix/Leica 14-50mm set at 50mm. At 3.5 the focus (or depth of field) is isolated on the one blossom. (Remember that all DPA instructors and classes will teach these photo techniques whether you own a Panasonic or any other kind of camera.) Tip #5 Set your exposure to make the water go a deep black to make the flowers pop: I metered the water in center weighted mode, and adjusted my exposure to make the water darker with the camera set to manual. Lumix L1 1/160th of a second at f/10. Lumix-Leica 14-50mm set to 50mm. Sun was side lighting the flower. I popped the flower with the flash to make it stand out from the dark water. (Remember that all DPA instructors and classes will teach these photo techniques whether you own a Panasonic or any other kind of camera.) Tip #6 Use fill flash to make the flower stand out even when the sun is out-use the sun as fill: Same metering as above to make the water darker.Lumix L1 1/160th of a second at f/10. Lumix-Leica 14-50mm set to 50mm. Sun was side lighting the flower. I popped the flower with the flash to make it stand out from the dark water. (Remember that all DPA instructors and classes will teach these photo techniques whether you own a Panasonic or any other kind of camera.) Tip # 7 Use a reflector. Here I used a gold reflector to bounce light from my on camera flash in bounce mode, aiming the reflector to light inside the flower: Lumix L1 1/125th of a second at f/6.3. Lumix-Leica 14-50mm set to 36mm. Lilly is popped with flash bouncing off a soft gold mini reflector disc to match the soft setting sun. I adjusted the placement of the reflector until it lit the inside of the blossom. (Remember that all DPA instructors and classes will teach these photo techniques whether you own a Panasonic or any other kind of camera.) All images © Anthony Brett Schreck and made with the Panasonic Lumix L1
Water-Bound Tornado

One night while my wife and I were having dinner I noticed a strange cloud formation out over the lake that we live on near Orlando, FL. Every summer the local news will show footage of a water spout at the beach and inform the viewer that a water spout is a tornado that forms over a body of water. Having seen many of these news stories in the past I instantly knew what it was I was looking at outside of our window and I quickly grabbed my Panasonic TZ3. I wasn′t alone in identifying the water spout as my neighbors were outside watching it as well. Turning the TZ3 on and changing the Mode dial to the motion picture setting I composed the picture utilizing the camera′s large LCD monitor on the back of the camera. Pressing the zoom lever to telephoto it allowed me to zoom in to capture the spout touching the lake. I was able to pan up and show the storm up to the clouds. After capturing different angles of the storm I was able to download the video clips to my laptop and edit them together in about 10 minutes using Apple′s iMovie software. After editing a few clips together I instructed iMovie to output the file as a web clip which was then emailed to the local ABC affiliate WFTV in Orlando. Channel 9 used the clip during the intro to its 11 o′clock news cast highlighting their lead stories. I was pretty impressed that while the TZ3′s video is not High Definition it is usable even for broadcast.
