Dusk and Night Webinar Tipñ Tripod DoÃs and DonÃts

Digital Photo Academy and LivinginHD present a free monthly series of photography webinars on LivinginHD.com. Your host, John Bentham answers many questions live during the webinars. Additional questions, answers and tips are posted here on digitalphotoacademy.com where you can also view the archived webinars.
Lifting a Camera: When using a tripod, Never lift the weight of the tripod by lifting the camera body, make sure the camera is firmly attached and then lift by the Tripod. I know a guy who ripped the guts out a camera body doing this; the insides were left on the tripod and he he was left holding a body shell.

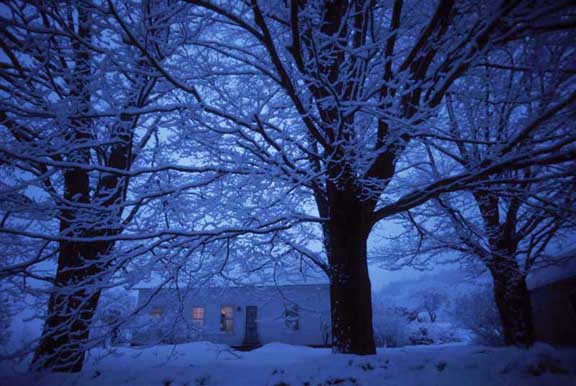
Photo by Frank Siteman, DPA Instructor Boston
Franks photo of the house set against a dusky blue woods is a beautiful example of playing with color balance. The warm light coming through the windows perfectly counters the blue color balance of the outdoor scene. The warm light indicates someone is home and transforms the scene from eerie to striking.
Lifting a Tripod: Use caution when you lift up the tripod with a camera attached to raise or lower the tripod legs, be careful not to bash the camera into the ceiling, lights, ceiling fan etc. When you set the height of a tripod make sure all the legs are level and set at the same the same leg extensions. It’s really annoying to work with an uneven tripod. I have etched hash marks in to the lower sections of my tripod legs for exactly this reason.

Fig 1 – 2307 Seconds (38 Minutes)
Photo by Hinda Schuman, DPA Instructor Philadelphia
The two starry night photos shot by Philly photographer Hinda Schuman are wonderful examples of extravagantly long shutter speeds. By utilizing such long speeds Hinda has made the rotation of the earth part of the creative process as evidenced by the star trails in the photos. Part skill, part careful planning, part chance and part whimsy … these are great photos.
Shooting from a Moving Platform: Whenever shooting while on a boat, or train you are better off not using a tripod as the motion of the waves, the rocking of the boat, or vibration of the tracks and motion of the train will be transferred through the tripod to the camera. In this situation you get better results hand holding the camera and using your body and arms to absorb the motion and camera shake.

Fig 2 – 286 Seconds (4.76 Minutes)
Photo by Hinda Schuman, DPA Instructor Philadelphia
Black Rapid Straps, Low Light Hand Held Shooting: Black Rapid is a camera strap speed sling system with the added bonus that the strap can be used as an improvised Steadicam when utilizing slower shutter speeds. By simply wedging your elbow through the strap you add an additional level of stability and rigidity for using slower shutters for still photography and more fluid motion when shooting video. For this type of shooting it’s also very beneficial, if not imperative to have fast aperture ( f1.4 – 2.8) lenses and steady hands.

Photo by John Bentham, DPA Instructor New York
The biker photo above was shot in low light with a fast f1.4 lens and a camera sling. The addition of the sling adds a bit more stability when shooting hand held at slow shutter speeds when the photographer is prohibited from using a tripod or it’s impractical to do so.
Working Outdoors in the Wind: When working outdoors, tripods will be affected by the wind. On set, umbrellas, lighting soft boxes, reflectors and flats etc. will always blow over, regardless of how little wind there is. Put a weight on it, even the camera bag, you can hang it with a karabiner. Tripods will often vibrate and jiggle in strong wind thus effectively countermanding the benefit of a tripod. You can minimize this by setting up a wind block, or in a pinch blocking the wind with your body, an umbrella is also effective to block the wind hitting a camera and tripod. Make sure not to mount the umbrella on the tripod itself, you risk a change in the wind direction changing your umbrella wind block into a sail.
Tripod Equipment Manufacturers sites:


