Lighting Webinar Tip 5 – Color Management, Color Correction, Spyder Checkr Color Target, Spyder Cube


Photos: © John Bentham, DPA instructor New York.
The images above, of a store front Halloween display are shot using a number of different White Balance settings on a Panasonic camera. By changing the white balance setting to an incorrect color temperature you affect creative control over the color. This can be good or bad depending on the subject, and the client. To get more accurate, consistent color you need to implement a color management system like Datacolor.
Spyder 3 Elite Monitor Color Calibration System and The Spyder Cube
The three dimensional design and solid durability of the Spyder Cube make it an ideal exposure and color balance benchmark tool in real world photographic situations. Once you’ve accurately calibrated your monitors using the Spyder 3 Elite Color Calibration System, and utilized The Cube during RAW color correction you can be confident the art director and clients are looking at the same photographs, with the same color tones you’re looking at. With the advent of digital imaging clients more often expect photographers to submit color corrected, retouched and ready to print images. More is expected of photographers for the same budgets, requiring digital processing to be done faster and easier. As a self contained, user friendly, desktop system Datacolor Spyder equipment can replace costly digital technicians and IT consultants making a photographer more competitive in this uncertain and changing marketplace.
For fashion and interior designers, architects, product manufacturers and other color driven industries, the specific colors utilized in fabrics, labels, paints, packaging and manufactured materials are crucial to the work they do. In some instances specific colors are trademarked and proprietary. Think Coca-Cola red, and Panasonic blue, and it is imperative for the photographer to have the technology to record and reproduce them accurately. For advertisers, magazines, printers, and display production industries having the tools to reproduce standardized colors is now a requirement. It’s no longer acceptable to get the colors close enough. Having the right tools to get the colors right is expected. With Datacolor and Spyder you’re closer than you would have thought possible!

Photos: ©John Bentham, DPA instructor New York.
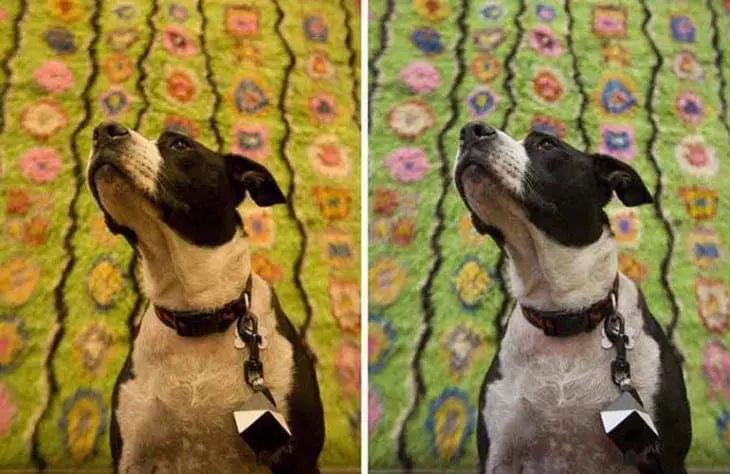
The photo on the left is without color correction as the camera recorded it in Auto White Balance. Very often AWB does an OK job, or this case a poor job of capturing color, especially in mixed light. The dog has a Spyder Cube hanging from his collar which provides an easy click-to-calibrate system using the eye-dropper tool during RAW import. To use the Cube you simply click on the brightest gray segment of the Cube which is a measure of color temperature and exposure of the brightest light source, the main or “Key” light. Instantly the color is fixed, corrected to a standard which you then use as a standard color calibration fix for all the other frames shot under those lighting conditions. You place the cube into the frame whenever you make a change in lighting to record another sample. It’s that simple.
The image below is from a test shoot of the new Spyder Checkr and Color Calibration system for cameras which enable you to calibrate and correct color for specific camera and lens combinations. John was a Beta tester on the Checkr color target system and ran it through paces. The actual Checkr product is now available and comes in a nifty hard shell case unlike the test charts below.

Photo: ©John Bentham, DPA instructor New York.
The image below shows the Spyder Checkr software at work. You simply pull the color chart from your image and import into Lightroom, or drag and drop with ACR, tweak the size to light it up and hit Save. You’re done. This provides a very accurate color calibration standard for all subsequent images from the shoot using that camera and lens combination. Like the Cube if you change the lighting or camera bodies or lenses you simply place the Checkr back in frame to shoot another benchmark shot and then shoot away.

Webinar Submission Specs:
All DPA students can submit photographs for inclusion in the Digital Photo Academy, LiHD Webinar, Online Photo Class Series. If you would like to submit your photographs for an upcoming webinar, read the following. Each webinar has a specific theme or topic. You can see the date and topic of the next webinar at LivinginHD.com, Tip of the Day, Online Photo Class. Note that webinars are edited and formatted days in advance, thus please submit your photos at least a week in advance of the webinar, late submissions can not be added. Photographs are chosen, and edited, for their applicability to the webinar theme, artistic and technical merit, and content length. If your photograph is NOT chosen, it will be archived and may appear in a more appropriate future webinar.
Submit your photographs to info@digitalphotoacademy.com
By submitting your photographs for consideration, you grant and authorize, The Digital Photo Academy, LivinginHD.com and Panasonic, the following rights: The right to use your photographs in the content and promotion of the webinar series, and for use on each company’s respective website. You further authorize your photographs may be archived online and/or in a database, and allow unrestricted internet availability of any webinars containing your photographs. You further authorize the use of your photographs in any future webinars. By voluntarily submitting your photographs for consideration you agree to the aforementioned without any legal claims, or claims for remuneration, whatsoever. You, as the photographer, retain the copyright © of any submitted photographs. The aforementioned companies will make best possible efforts to apply proper photo credit and acknowledgement with your photograph whenever possible and practical.


