Flowers Webinar – Flash for Flower and Macro Photography

Flash, Sharpness and Detail In Flowers and Macro Photography
Flower and Flora Photography and NIK Image Enhancement Webinar
John Bentham
Digital Photo Academy and LivinginHD present a free monthly series of photography webinars on LivinginHD.com. Your host, John Bentham answers many questions live during the webinars. Additional questions, answers and tips are posted here on digitalphotoacademy.com where you can also view the archived webinars.
To capture detail and sharpness in close-up macro flower photography there are a number of techniques available to a photographer. When shooting Flowers, especially in macro photography it is often useful when striving for sharpness, contrast and saturation to add a little flash. Very often the camera and or the photographer are so close to the flower a shadow is cast on the subject itself. By adding a little lighting boost with some supplemental flash you bring that extra sparkle back into the photo. This also works well in overcast conditions, rainy days or when the subject is situated in shadow such as shooting wild orchids in deep forest.

Photo by Frank Siteman, DPA Instructor Boston
Another technique, applied in post production and evident in the photo above, shot by Boston DPA instructor Frank Siteman is the use of NIK Software Viveza 2. Specifically Frank has utilized added structure accessed via a slider control in Viveza 2, adding structure is a great way to bring out hidden details and clarity, either globally in a photograph or selectively to areas of a photo. With the Control Point system in NIK you are afforded great fine control over very specific parts of the image as evidenced in Franks photo, where the anther and stamen of the flower appear very sharp and precise.
If you are incorporating flash into your photo system there are a number of different options but for the most part you must move beyond the little Pop Up flash built into your DSLR. This pop up flash often casts a shadow on the scene. Depending on the length of the lens mounted on the camera the lens itself will block the light from the flash. This shadow which appears as a semi-circle in the bottom part of the frame. Dedicated Macro flash units are sold for many camera systems in addition to Ring Flash units which can be very useful useful. Alternatively you can use an auxiliary external flash unit Off-Camera with an adapter cord. The cord will allow you to position the light off camera for a more natural or pleasing light yet still retain the TTL features of your camera for better exposure (TTL=Through The Lens exposure).

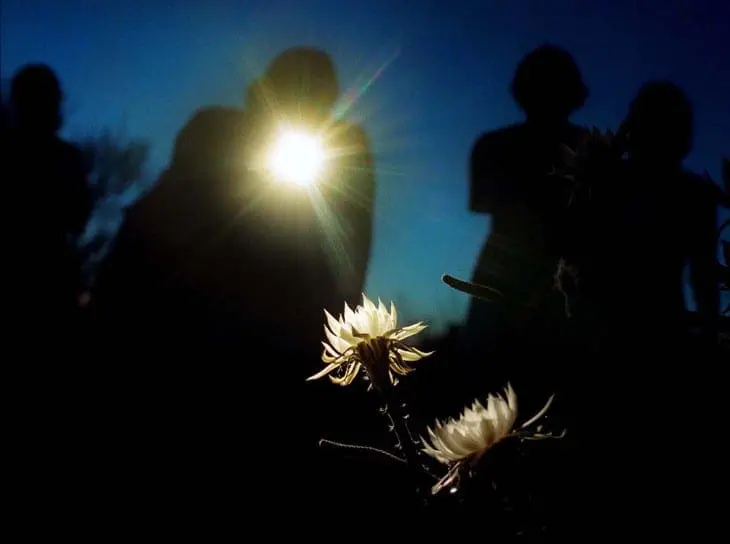
Photo by David Sanders, DPA Instructor Tucson
The haunting, eerily beautiful image above photographed by Tucson photographer and DPA instructor, David Sanders includes the fortuitous flash of one of Davids students in the photo. David has utilized a slow shutter speed to sync his exposure with the flash from another camera thus providing a backlit light source for the desert blossoms. The slow shutter speed also bleeds in the blue sky of the background accentuating the silhouetted figures adding depth and complexity to the image.
There are a number of situations when using a flash outdoors in daylight is helpful. If you are photographing a flower positioned in shade, but the background is brightly lit, you may have an exposure difference of 3-4 stops between the two. You can use flash to narrow the gap and correct the contrast. Flash power, no matter how much you dial it up will usually NOT overpower the sun (unless youre using a very large powerful, studio type unit). That means you should be using the flash to supplement the ambient light, usually the sun, not provide the main light. To control the output of your flash use the Plus / Minus flash power adjustment and a little trial and error. This is available on in the camera menu or on the back of an external flash unit. Determine your ambient exposure first (the regular exposure without using flash). Get a good exposure without flash and then add a low power flash to see the result. You then dial in the flash incrementally to achieve the effect you want.

Photo by John Bentham, DPA Instructor New York
Another example of utilizing software to enhance the detail of a floral image appears above in an image shot by John Bentham, DPA instructor in New York. John shot this image at Wave Hill a park loacted in The Bronx outside one of their greenhouses. The image on the left is the original jpeg, the final image on the right having been enhanced with Photoshop and NIK Software. The right image shows a little clean-up of imperfections using Photoshop to remove blemishes and a few marks caused by dust on the digital sensor (what photographers refer to as housekeeping when retouching). Then John has applied structure to selective areas of the image to bring out the detail in the sky and the leaves, then boosted the contrast and saturation to make the image pop. A simple, quick and easy fix to add impact to an image giving it a more vivid colorful look.


