DPA Magazine
Being Creative with Light Trails
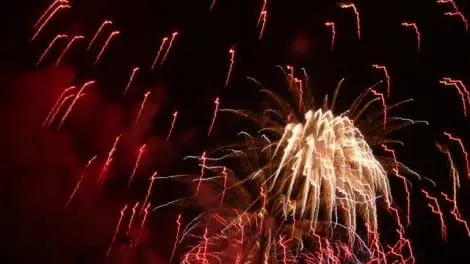
While it is strongly recommended to shoot fireworks using a tripod, there are some instances when it may not make too much difference. Such as on the case of a tripod on a boat! The classic curves normally found in fireworks are almost always shot from a static camera on tripod, but when the camera or photographer is moving, some interesting results can occur. Jagged streaks of light and unpredictable trails of light can also create some interesting images. Especially if you used a boat to get closer to the fireworks. With a little practice, you can begin to paint with light inside the camera!
Water Music
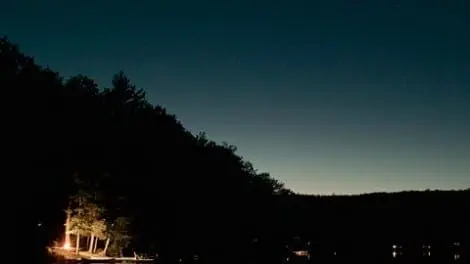
When shooting night photography, I typically employ the THREE Ts—Tripod, Testing, and Timer. Let′s take them in order. Tripod. Almost any night shot will require that your camera is on a very stable base. Shooting from the shores of the lake, I was very happy to have my super light and sturdy Manfrotto carbon tripod. With its easily adjustable legs (both angle and length), I quickly found sure footing in some rocks and water. The responsive handle-style ball head easily leveled the image′s horizon. Testing Night photographs will be LONG exposures. I picked a fairly large aperture like ƒ4 and flipped my point-and-shoot to Manual Exposure. Now, the testing started by trying out various long (many seconds) exposures. At 8 seconds the scene was dark, but at 12 seconds I had the perfect exposure. Timer. When you trigger the shutter, even when on a tripod, your hand pressure can actually cause blurring. As I don′t always carry a cable release with me (or sometimes misplace it.), the Self-Timer comes to the rescue. By triggering your shutter with the Self-Timer you will have your hands completely free of the camera when the shutter triggers the exposure. No motion, no blur.
Shutter Speeds & Water
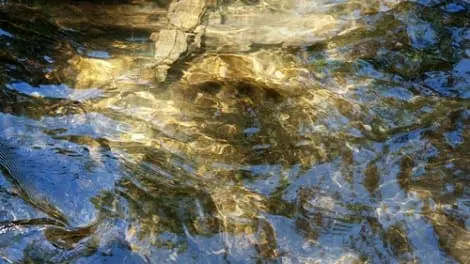
© Ellen Yeiser Awe summer, what a great time to get outside and photograph mother nature. Water is a fascinating and endless subject. When shooting water, shutter speed is everything. If you want the water to have a silky, white feel or show motion use a slow shutter speed. You may have to use a neutral density filter to get a slow enough shutter speed. To freeze water use a high shutter speed. I used a a shutter speed of 250 as I wanted the reflections to be frozen and clear. Experiment with different shutter speeds as you shoot water.
Flowers Webinar – Resizing Images, Scaling images for Large Prints and Reproductions
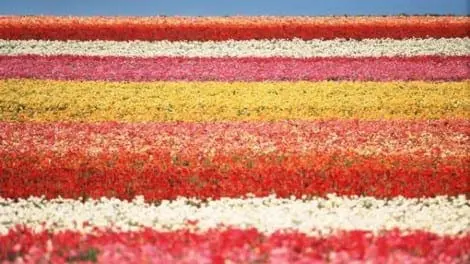
Flowers Webinar Photo Tip 4 – Resizing Images, Scaling Images up for Large Prints and Reproductions Flower and Flora Photography and NIK Image Enhancement Webinar John Bentham Digital Photo Academy and LivinginHD present a free monthly series of photography webinars on LivinginHD.com. Your host, John Bentham answers many questions live during the webinars. Additional questions, answers and tips are posted here on digitalphotoacademy.com where you can also view the archived webinars. Very often a pretty picture of a flower will become a beautiful landscape when enlarged to poster size or even bigger. There are a few tips you can use when sizing your images to avoid losing detail in the process. The tips below apply regardless of whether you are printing from your own large scale desktop printer or uploading online to a printer and poster fulfillment service. Photo by Christian Michaels, DPA Instructor San Diego The 1960s color field paintings of Mark Rothko on first inspection appear as simple constructions comprised of basic graphic elements, bands and patches of color layered on a canvas. It is only after closer inspection and study that the complexities of these priceless artworks become evident. Much like Rothko’s paintings the multilayered banded fields of flowers in Chris Michaels photo above appear as an abstract expressionist painting, the individual elements being less important than the whole. When you imagine Chris’s photo enlarged to a Rothko sized 60 x 80 inches it takes on not just monumental proportions literally but heightened significance figuratively as well. When re-sizing your images for large scale reproduction you can make color, structure, contrast and exposure corrections using NIK software before your resizing method but its also a good practice to re-visit the file after the enlargement. Very often once you enlarge an image there are many details that come out that were not visible or apparent before. These areas can be further enhanced with NIK Software and any imperfections can be touched up using Photoshop. Photos by John Bentham, DPA Instructor New York Compare the two versions of the photo above shot by New York DPA instructor John Bentham. The top image is the original file, shot straight to jpeg on a relatively low resolution camera (8MP). The bottom image has been enhanced using Viveza 2 and Color Effects Pro from NIK Software. You can see a significant difference in detail, structure, contrast and legibility in the lower image. By applying some of the tricks in NIK software and following a step up procedure in enlarging the image John was able to produce a 20 x 30 inch print with great detail. Photo by Chuck Place, DPA Instructor Los Angeles The beautiful, almost magical landscape photo above shot by Chuck Place, a DPA instructor in Los Angeles is a great of example of a photo with great Depth of Field, meaning objects in the foreground, middle ground and background appear in focus. By shooting at a relatively small aperture Chuck has captured this wide range of focus giving the photograph visual depth draws your eye into the scene. This is exactly the type of detail you want to preserve in your prints, especially in large scale reproductions. Photo by Steve Dunwell, DPA Instructor Boston The tulip photo above shot by Boston DPA instructor Steve Dunwell is a great example of a flora photograph that would look spectacular enlarged to a grand scale, much larger than life size. When flowers are blown up to 20 x 30, or 30 x 40 inches they become majestic images, almost spiritual, reminiscent of Georgia O Keefe paintings. Steves tulip photo reproduced on such a grand scale would become more than the flowers themselves, becoming more about the colors and patterns, almost a graphic representation of flowers. Step-Up Sizing Process: Beginning with the image created by your camera you are looking for a larger quality and higher resolution file jpeg to use as your source file for printing. Depending on your camera the default output resolution will be displayed as dpi (dots per inch). 300dpi, 72 dpi, 180dpi are all common default sizes but this size is set by the manufacturer. The resolution size (dpi) is also accompanied by an image sixe, height and width dimensions either in pixels or inches. For example a particular camera might generate an image of 10 x 15 inches at 300 dpi, while another manufacturers camera may generate an image at 72dpi with dimensions of 38 x 54 inches. These numbers will also be determined by the capture resolution of your camera, how many Mega Pixels your camera can record. Regardless of the default size after capture an image can changed and stepped-up in size with image software (Photoshop) to produce a high quality, high resolution print. Most often people make one blunt change in image size, changing the size to 20 inch at 72dpi which results in a small file. Or they size up without steps in between resulting in a loss of image quality. To size correctly with very little, if any image loss follow the procedure below. If you are starting with a 72dpi file (native resolution for many cameras) at approx 38 x 54 inches. Most people assume because they are at 72dpi these are small. This is a very large file at approx 40+MB. To alter the size to a larger or printable version you need to make size changes in steps. To make a 300 dpi file at 16 x 20 inches, suitable for printing follow steps below: Starting with 72 dpi, 69 x 46 inch file. Make a copy of file (DO NOT work on the original). Using Image software (Photoshop) open the copy image size Then open the image size box (Option+Command Letter I on a Mac using Photoshop) See document size boxes for Width, Height & Resolution Make sure the constrain proportions box is checked ON Change Width to 60 inch, Height will change in proportion (to 40) Change resolution to 100 dpi Hit OK Then follow the same steps each time in-putting the following specs. Between each step you need to re-open image size box. You do NOT need to Save file each time, just make sure to SAVE at the end of the step-up process. Change Width to 50 inches, Change resolution to 150, Click OK. The Height will default to the corresponding dimension provided the Restrain Proportions Box is checked. Change Width to 40 inches, Change resolution to 175, Click OK. Change Width to 30 inches, Change resolution to 200, Click OK. Change Width to 25 inches, Change resolution to 250, Click OK. Change Width to 20 inches (Height will default to 13.334 inches), Change resolution to 300, Click OK. Enter SAVE command You now have a hi res file at 300 dpi, 20 x 13.3 inches. File size will be a very high 68MB (approx). With this method you can start with an image form a relatively small 8MB camera and produce a 40 x 60 inch print without too much loss of detail. Depending on your camera and the image size you are starting with you will need to adjust the step up sizes accordingly. If you are beginning with a file already at 300 dpi you don’t make any changes to the resolution size you simply size up (or down) the dimensions gradually to get to your desired finished print size.
Wedding Webinar Tip – Fast Lenses, Wide Aperture
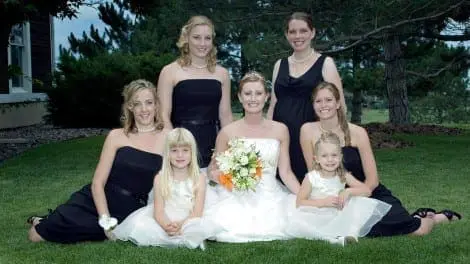
Wedding and Event Photography and NIK Image Enhancement Webinar John Bentham Digital Photo Academy and LivinginHD present a free monthly series of photography webinars on LivinginHD.com. Your host, John Bentham answers many questions live during the webinars. Additional questions, answers and tips are posted here on digitalphotoacademy.com where you can also view the archived webinars. When shooting in low light the faster your lens (the wider the aperture), the higher your shutter speed can be, which reduces the chance of camera shake and minimizes subject movement. With a faster lens you also don’t need to raise the ISO as high, thus minimizing digital noise issues you get at very high ISO’s such as 3200. You pretty much need a full time f2.8 lens or faster, to shoot this type of work. The kit lenses supplied with most DSLR’s have limited capabilities. A kit lens will allow you to shoot at f3.5 if your zoom is set to 18mm, only 1/2 stop slower than 2.8. But when you zoom out to 200mm the mechanical limitations of the lens restrict you to shooting at f5.6 or even f6.3 depending on the lens, which is usually too slow to shoot wedding ceremony photos without using flash. Many churches and temples place restrictions on photographers, including the use of flash during the actual ceremony in addition to certain areas where photographers are not allowed to stand. Photo by Russ Burden, DPA Instructor Denver The photo above shot by Russ Burden, one of the DPA Instructors in Denver is a classic group wedding formal shot. Regardless of your personal taste in photographs or how fun and funky you want to shoot a wedding be prepared to shoot some formal shots. Russ has kept the composition clean with a layered but not distracting background, has left some space around the group so the photo can breath, and has used a normal lens (52mm in 35mm equivalent), thus keeping the perspective normal and not allowing any distortion at the edges. You can tell Russ has added a little supplemental flash to brighten up the faces and the clean white of the brides dress, sometimes you just need a little kick light to bring it all together. For the few select wedding I shoot each year I usually shoot my standard documentary set-up, the current prevailing style of wedding photography has a documentary slant so the system fits perfectly. Two cameras, the first being a full frame sensor body with no X-Factor, with a wide zoom and the 2nd small digital sensor body with a longer zoom. The purpose for this is two fold. If anything goes wrong with a camera you just swap it out, you don’t want to have 200 people staring at you while you try to figure out what’s wrong with your camera, figure it out later. The 2nd reason being by carrying the two bodies with two different zoom lenses I am always carry a very wide range of focal length without ever having to change lenses. Most group shots will be taken at approx 35–50mm on the zoom range. Ideally you don’t want to shoot groups of people with focal length wider than 35mm but its nice to be able to zoom out a bit wider if you have to suddenly go from shooting a group of three to a group of ten people. With a sometimes boisterous crowd there is often no room to physical move back and use a longer lens, especially if every time you back up a guest jumps into your frame with a cell phone camera. A wide zoom handles this very nicely and without too much distortion as long as you remember not to put larger people on the edge of frame where they blow up. Photo by John Bentham, DPA Instructor New York The photo above of the wedding tent, is a good example of shooting hand held using a fast lens. This image photographed by John Bentham in Pensacola, Florida was shot at f2.8 at .6 seconds at 800 ISO, about the limit you can shoot hand held, and at about the limit for ISO before you start getting digital noise. The f2.8 lens used enabled the photographer to shoot without a tripod. At slow speeds like this you still need to be mindful of camera shake but with a little practice you’d be surprised how steady you can hold a camera. For longer shots I use a 70-200mm Zoom specifically mounted on a smaller digital sensor. This extends the zoom range of the lens once you apply the X-Factor. To work out the X-Factor you simply multiply the focal length of your lens by the X-Factor for your camera. Panasonic Cameras have an X-Factor of two. Canon cameras an X-Factor of 1.6 and Nikon cameras have an X-Factor of 1.5. When using a 70-200mm lens, this equates to a working zoom range of 112–320mm. From the back of the church this focal length was long enough for me to get relatively close up shots without having to lug a 300 or 400mm lens around all night. Whenever possible use an OIS, IS or VR Lens (Optical Image Stabilization, Image Stabilization, Vibration Reduction). Photo by John Bentham, DPA Instructor New York For long lenses it’s best to shoot at a shutter speed of at least 1/60th, higher is even better but certainly no slower than a 30th of second. At a 1/30th there is little risk of camera shake if the camera is supported but the subject movement can still be quite blurry, even if the subject is seated. You are better shooting at 1/60th second and bumping up the ISO a stop. The photo above shot by John Bentham captures the little flower girl through the arms of her dancing parents, a fun loose whimsical shot. Again shot at f2.8 at 1/6th of a second but with added flash to brighten the image and stop the action. By slowing down the shutter speed this has bled in the ambient background light and prevented the background from appearing pitch black as is often the case with interior party photos. John has used a little NIK Viveza 2 Software to bring out some detail on the girl (added structure and contrast), and toned down the exposure on the dancers, a result of them being much closer to the flash.
Flowers Webinar – Flash for Flower and Macro Photography
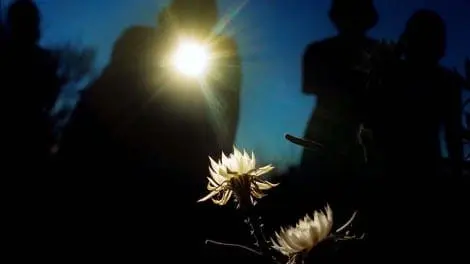
Flash, Sharpness and Detail In Flowers and Macro Photography Flower and Flora Photography and NIK Image Enhancement Webinar John Bentham Digital Photo Academy and LivinginHD present a free monthly series of photography webinars on LivinginHD.com. Your host, John Bentham answers many questions live during the webinars. Additional questions, answers and tips are posted here on digitalphotoacademy.com where you can also view the archived webinars. To capture detail and sharpness in close-up macro flower photography there are a number of techniques available to a photographer. When shooting Flowers, especially in macro photography it is often useful when striving for sharpness, contrast and saturation to add a little flash. Very often the camera and or the photographer are so close to the flower a shadow is cast on the subject itself. By adding a little lighting boost with some supplemental flash you bring that extra sparkle back into the photo. This also works well in overcast conditions, rainy days or when the subject is situated in shadow such as shooting wild orchids in deep forest. Photo by Frank Siteman, DPA Instructor Boston Another technique, applied in post production and evident in the photo above, shot by Boston DPA instructor Frank Siteman is the use of NIK Software Viveza 2. Specifically Frank has utilized added structure accessed via a slider control in Viveza 2, adding structure is a great way to bring out hidden details and clarity, either globally in a photograph or selectively to areas of a photo. With the Control Point system in NIK you are afforded great fine control over very specific parts of the image as evidenced in Franks photo, where the anther and stamen of the flower appear very sharp and precise. If you are incorporating flash into your photo system there are a number of different options but for the most part you must move beyond the little Pop Up flash built into your DSLR. This pop up flash often casts a shadow on the scene. Depending on the length of the lens mounted on the camera the lens itself will block the light from the flash. This shadow which appears as a semi-circle in the bottom part of the frame. Dedicated Macro flash units are sold for many camera systems in addition to Ring Flash units which can be very useful useful. Alternatively you can use an auxiliary external flash unit Off-Camera with an adapter cord. The cord will allow you to position the light off camera for a more natural or pleasing light yet still retain the TTL features of your camera for better exposure (TTL=Through The Lens exposure). Photo by David Sanders, DPA Instructor Tucson The haunting, eerily beautiful image above photographed by Tucson photographer and DPA instructor, David Sanders includes the fortuitous flash of one of Davids students in the photo. David has utilized a slow shutter speed to sync his exposure with the flash from another camera thus providing a backlit light source for the desert blossoms. The slow shutter speed also bleeds in the blue sky of the background accentuating the silhouetted figures adding depth and complexity to the image. There are a number of situations when using a flash outdoors in daylight is helpful. If you are photographing a flower positioned in shade, but the background is brightly lit, you may have an exposure difference of 3-4 stops between the two. You can use flash to narrow the gap and correct the contrast. Flash power, no matter how much you dial it up will usually NOT overpower the sun (unless youre using a very large powerful, studio type unit). That means you should be using the flash to supplement the ambient light, usually the sun, not provide the main light. To control the output of your flash use the Plus / Minus flash power adjustment and a little trial and error. This is available on in the camera menu or on the back of an external flash unit. Determine your ambient exposure first (the regular exposure without using flash). Get a good exposure without flash and then add a low power flash to see the result. You then dial in the flash incrementally to achieve the effect you want. Photo by John Bentham, DPA Instructor New York Another example of utilizing software to enhance the detail of a floral image appears above in an image shot by John Bentham, DPA instructor in New York. John shot this image at Wave Hill a park loacted in The Bronx outside one of their greenhouses. The image on the left is the original jpeg, the final image on the right having been enhanced with Photoshop and NIK Software. The right image shows a little clean-up of imperfections using Photoshop to remove blemishes and a few marks caused by dust on the digital sensor (what photographers refer to as housekeeping when retouching). Then John has applied structure to selective areas of the image to bring out the detail in the sky and the leaves, then boosted the contrast and saturation to make the image pop. A simple, quick and easy fix to add impact to an image giving it a more vivid colorful look.
Wedding Webinar – Editing Photos, How to Choose the Best Shot
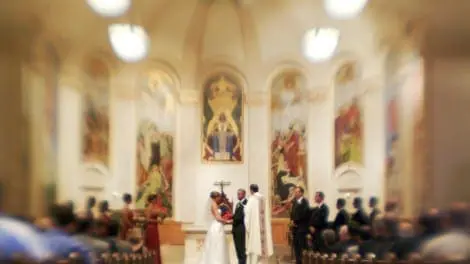
Editing Photos, How to Choose the Best Shot Wedding and Event Photography and NIK Image Enhancement Webinar John Bentham Digital Photo Academy and LivinginHD present a free monthly series of photography webinars on LivinginHD.com. Your host, John Bentham answers many questions live during the webinars. Additional questions, answers and tips are posted here on digitalphotoacademy.com where you can also view the archived webinars. Photo by Craig Strong, Lensbaby, Portland Oregon The stylish photo above shot by Lensbaby inventor and CEO, Craig Strong has a dreamy quality to it which is what the Lensbaby does best. You can see the classic Lensbaby Sweet Spot center, surrounded by the soft focus fall off front and back, and the soft breadth of focus side to side. Craig culled through a number of frames to pull this one one shot where the center sharpness was just right in addition to the positioning of the bride, groom and priest. When editing a large number of photographs the difficulty is often determining which are the 10 best, or one best from a series of photos. This can be especially difficult if you are just beginning your photography career. I remember my first assisting job many years ago, I was a week out of photo school and had landed a job working for a fashion photographer. My very first task was to develop 50 rolls of 35mm black and white negative film the photographer had shot a few days before. Stressfully I developed the film and made contact sheets without any hitches and I started looking through the images with a loupe. The shoot was a marketing campaign for a wool marketing board. The photographs were of a young boy wrapped up in a plaid wool blanket asleep in the back seat of a beautiful vintage 1950s Chevy. It was a sweet, nostalgic, softly lit beautiful image. The problem was out of 1800 images I couldn’t tell one from the other, to me they all looked the same. Photos by Adam Stoltman, DPA Instructor New York In the sequence of four photographs above shot by New York DPA Instructor Adam Stoltman you can see the progression of events as the bride and groom enjoy a personal moment alone on the beach during their wedding in the Bahamas. When editing this sequence you should look for specific things to determine which is the strongest image. Top Left: This photo is interesting but the groom is all but blocking the bride. There is a little bit of sea grass coming in from the bottom but its more a distraction than a working element. Top Right: This photo is beginning to come together, there is separation between the bride and groom. The grass is more prominent. Bottom Left: In this image the grass becomes a more significant and playful element making for a stronger photograph by adding another dimension and depth to the image. Bottom Right: This for me is the best image of the series. The sea grass is in a nice position. There is good separation between the new couple where you can really see their clasped hands a very nice touch. And finally the brides face is tilted up catching the light a bit more than the previous shots. Sometimes all is takes is a bit of luck. Of course once you’ve done your homework, and found your camera position, and chose your focal length, and set your focus, and nailed the exposure, etc, etc ......! Look again at the final select below and you will notice the details I have pointed out. Photos by Adam Stoltman, DPA Instructor New York When you first start looking at images, yours or those of other photographers, this is a uncommon issue. The skill of choosing a winner develops over time and develops faster the more images you look at. If you find yourself in a situation where you need to edit a shoot down to just one image a good technique is to compare no more than two images at once. Its very easy to get confused and overwhelmed when you’re juggling 20 – 30 images in your head. You keep jumping back and forth between 10 – 15 good ones and get confused very easily and can never come to a decision. The trick is a system, you just start with an initial edit, weed out what we call the winks and blinks, any shots with people making funny faces, or any technical gaffs, where the exposure or focus didn’t work well etc. Delete those. Then go through and tag what you consider the best as an initial edit. From a shoot of 500 images you′re looking to pull out 100 possible images. Then go through that 100 and pull out a better quality selection of 25 images. Now you′re down to a reasonable number to begin comparing individual images in pairs. Switch your editing process to a method where you are comparing only two images at any one time. Adobe Bridge works well for this as you can easily pull up on screen any two images from a folder. Then star rating system in Bridge is useful as well, you just tag your possible selects with a star (or multiple stars) and then by switching the view option to View by Rating, you can drag or save all your selects to a new folder in one move. Using this method reduces the editing process to a simple process of elimination – Is this one better than that one? Yes or no? Each time you compare two images you choose the best one and then move on to compare it to the next image. Don’t waver, don’t start back pedaling and give an image a second look, fight the urge. You will find this works very well if you stick to your guns. If you don’t believe me just start the whole process over again. More often than not you will come out with the same best shot in the end. After a bit of practice using this method you can edit very quickly and painlessly. After doing this for 20 years I can now cull a shoot of 2000 images down to 10-20 select images in about 1 hour. You’ve heard the adage, first you get good, then you get fast. Give it a try and go for it. Photo by John Bentham, DPA Instructor New York The image above shot by New York DPA instructor John Bentham was chosen from approximately 25 images of the bride and grooms dash from the church to the limo. All in the scene was tart to finish 30 seconds but by shooting high burst rate John was able to record quite a number of frames. John chose the shot above because it appeared the bride and groom were really worried about being pelted with rice, it showed defensive posture and their determination to get to the car. A somewhat atypical image perhaps but fun none the less.
Color as Composition
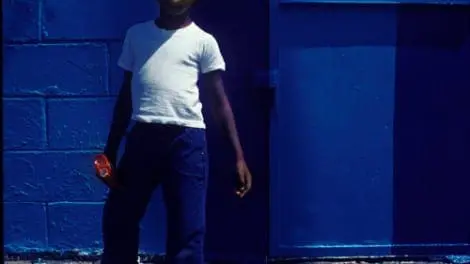
0 false 18 pt 18 pt 0 0 false false false /* Style Definitions */ table.MsoNormalTable {mso-style-name:"Table Normal"; mso-tstyle-rowband-size:0; mso-tstyle-colband-size:0; mso-style-noshow:yes; mso-style-parent:""; mso-padding-alt:0in 5.4pt 0in 5.4pt; mso-para-margin:0in; mso-para-margin-bottom:.0001pt; mso-pagination:widow-orphan; font-size:12.0pt; font-family:"Times New Roman"; mso-ascii-font-family:Cambria; mso-ascii-theme-font:minor-latin; mso-fareast-font-family:"Times New Roman"; mso-fareast-theme-font:minor-fareast; mso-hansi-font-family:Cambria; mso-hansi-theme-font:minor-latin; mso-bidi-font-family:"Times New Roman"; mso-bidi-theme-font:minor-bidi;} © Jarvis Grant Design elements of color was at the heart of creating the image. I am drawn to color and light when making spontaneous images, and sometimes the subject is secondary. Light and color are the keys to making a meaningful image. With this image, color and light are the secret ingredients when communicating with the viewer.
Hit the Water!
© Michael Thoennes Its time to hit the water! Using an underwater camera and an on camera flash, Michael Thoennes jumped into the pool and photographed the model below the surface. The blue of the pool water is less apparent on the hand because of the color and intensity of light from the on-camera flash. A great excuse to get a Panasonic Lumix TS camera, Waterproof. Keep it simple and frame your subject quickly. Using aperture priority and the on camera flash with a flash exposure compensation of +1/3 you should get a good shot. Have fun.

