DPA Magazine
Great Photos at the Beach

The best time to be at the beach is sometimes the worst time for taking a great photograph. Direct midday light means great sun-tanning but it is a harsh and unflattering light for photography. Subjects tend to squint and the light bouncing off of sand can fool the exposure meter of your camera into under- or over-exposure. Here are the three best tips for taking better portraits at the beach: 1. Shoot on an overcast day. Cloudy conditions in the middle of the day means a softer, more flattering light and subjects who don′t squint. 2. Shoot into the afternoon or setting sun. This is only possible with SLR cameras with full manual controls, because your automatic exposure meter would underexpose the image leading to a silhouetted subject. Shooting at a proper exposure for backlit subjects will reveal even, shadowless skin tones and an blown-out, artistic background. 3. Shoot under a beach umbrella. Professional photographers prefer to shoot under open shade when they have to shoot in harsh mid-day sunlight. Your beach umbrella is a portable shadow that creates the soft, flattering light needed to take a great portrait. © 2007 Joel Silverman, Atlanta DPA Instructor
Break the Rules!

Sometimes breaking the rules can yield dramatic images. In this case, I chose an angle that provided extreme back-lighting of the subject. Central Park, NYC © 2007 Douglas Carver, New York DPA Instructor
Add a Moon and Use Strong Sunset Light
High desert was shot off of old Highway 8 on the California Mexico border. This rock is about 2 hours east of San Diego and visible from highway 8. Lots of interesting rock formations in all high desert areas. I shot this in the spring because of the strong sunset light bouncing off of large cumulus clouds behind me to the west. The desert air is very clear through April and May and on cold evenings the moon is quite bright. Of course there are many interesting images to be shot after the early spring showers when the desert blooms. High Desert Moon Rise: © 2007 Ken DeJarlais, Seattle DPA Instructor
Weave Magic Into A Sunset
How can you weave a little more magic into your sunset photographs? This photo, taken on the Greek Island of Paros, presented some real opportunities. Instead of standing upright while making the shot, I crouched down low next to the water to create a sense of boating, swimming, or floating. I shifted the horizon to the extreme upper edge of the image and that painted a beautiful, murky-black mystery at the bottom. Although I kept the mountain peak in the center of the image, adding the mast and thin rope lines at right created a kind of kinship of triangular shapes—one opaque and one transparent. I stayed patient with the light until it hit an eerie, peaceful softness—very much like a watercolor drawing. © 2007 Rick Wright, Philadelphia DPA Instructor
Walk in Circles and Step Back
Location - 94th St. and 5th Ave., Manhattan Tip: It pays to walk in circles, turn around, take a few steps back-you’ll see things you might otherwise miss. © 2007 Bob Blanken, Washington DC DPA Instructor
Use Backlighting for Leaves and Flowers
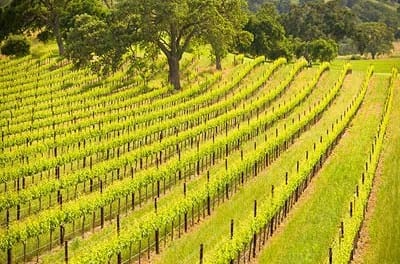
Although much of Southern California is either dry chaparral or even drier desert, winter rains create a transformation that belies the arid climate, quickly turning everything green for a short month or two. This metamorphosis is especially dramatic in the wine country located just north of Santa Barbara, California. I stumbled on this location while driving the winding Foxen Canyon Road off of Highway 154 near the town of Los Olivos. The image is from my soon to be released book “The Beautiful Santa Ynez Valley”. Spring in the Santa Ynez Valley is a collage of new leaves, all painted in different shades of green. The tender, new grape leaves in the vineyards are an especially vibrant yellow-green when backlit. © 2007 Chuck Place, Los Angeles DPA Instructor I positioned myself on a nearby hillside and set my camera on a Gitzo tripod, framing the landscape tightly with a zoom lens. The zoom range made it possible to crop out extraneous buildings and compress the rows of vines as they flowed over the hills. I made sure to shade the front element of my lens from the sun to avoid flare and opened up 2/3 of a stop from the meter reading. Anytime I photograph flowers or leaves, I try to use backlighting. Light passing through a leaf will produce a much more saturated color than light reflecting off the surface. And in this situation, the soft green of new spring leaves is exactly what I am trying to capture.
Taking Panoramic Shots
Pondicherry Wildlife Refuge - Jefferson, NH Tip 1: This image was stitched together from a number of separate frames. A new feature in CS3 that makes this process a lot easier is called zoomify. Of course you need CS3 for this feature, but to find out more, visit www.zoomify.com. Tip 2: Need a portable, inexpensive tripod in a pinch? All you need is a latex glove and some rice, lentils, small beans, sand, or a similar substance. Simply fill the glove and you′ll have a bean bag on which you can rest your camera. The last step is to either use a self timer or very carefully trip the shutter. © 2007 Frank Siteman, Boston DPA Instructor
Storytelling in a Landscape

In this image, I love how the viewer is led through the landscape. Bright yellow flowers, on camera right, begin a path over and around lichen-covered rocks and red earth. As we near the end of the trail—a heavy sky opens up, ready perhaps to spill its rain. The gray clouds help create an atmosphere of soft diffused light and shadow-less color, while the gentle slope of the rocks and meandering trail give motion to an otherwise still composition. The image gives us a sense of farawayness, and we are left wondering about the spaces and moments beyond the frame. What looms behind the rocks? Where are they now resting? Near the edge of a cliff, or in the middle of an open plain? Will the inclement sky make good on its promise? In this photograph, then, what is not revealed is as intriguing as what is. Herein lie a series of questions, quietly demanding our attention. Camera: Panasonic Lumix DMC-TZ3 (simple mode) © Angilee Wilkerson, Dallas DPA Instructor
Spring Blooms – “Live View” to the Rescue
Tip: Spring means rebirth, new growth, and a time when trees, shrubs, flowers, and all vegetation beautifies the earth in bold rich color and soft pastel tones. This past April I went walking through a park to look for photos with my brand new Panasonic L1 35mm SLR with Live View capability. Without it, the accompanying image of the magnolia blossom would not have been possible. The bloom was approximately 9 feet from the ground. Looking through a viewfinder at this height couldn’t be done unless I carried a step ladder. Live View allowed me to hold the camera above my head and compose the scene on the LCD on the back of the camera. For point and shoot users this is common, but the Panasonic L1 is one of only three SLR cameras that have this capability. Combined with the fact the body has a built in flash, I was able to add fill light to the dark side of the bloom. With the very bright Live View image on the LCD, I framed the blossom against a blue sky and made sure no mergers occurred with the background elements I included in the image that frame the blossom on either side. © 2007 Russ Burden, Denver DPA Instructor
Raindrops Can Add Impact to Your Floral Images, But Dress Appropriately!
The annual Tulip Festival in the Skagit Valley draws over 1 million visitors each year to view acres of tulips, and formal gardens. © 2007 Jon Canfield, Seattle DPA Instructor Location: Skagit Valley, Washington. About 1 hour north of Seattle, take I-5 to the La Conner exit. Best time to go: Weekdays to avoid the weekend tour busses. © 2007 Jon Canfield, Seattle DPA Instructor What to wear: Plan on getting muddy! Rain is common, and the ground is always wet, sometimes with very soft mud. Bring an umbrella to protect your camera. © 2007 Jon Canfield, Seattle DPA Instructor
