DPA Magazine
Frank Veronsky′s Summer Parties and Recipes Webinar
On September 1, 2009 (just before Labor Day), Frank Veronsky hosted an hour long webinar about photographing summer parties and barbeques. While summer may be over now, Frank′s great tips can easily apply any time of year.
High Speed Night Photography
High Speed Night Photography By Milton Heiberg Two students of the Orlando DPA (Digital Photo Academy) Advanced Workshop and the instructor (me) were invited to photograph the STS-128 shuttle launch, scheduled for early morning Tuesday, August 25, 2009. We were invited by a third student, Greg Lohning, who happened to be a career employee of NASA and past member of the closeout crew—the guy who inspects the astronauts as they enter the spacecraft. Two of us, Peter Lapin and I, jumped at the opportunity. We stood by our cameras through the night, watching lightning strikes throughout the Atlantic Ocean behind the well-lighted launch tower (a beautiful sight on its own), until the mission was finally scrubbed because of the bad weather. Well, on the optimistic side of disappointment, it gave us a chance to examine our trial shots on the computer, re-think our settings, and come back for the next scheduled launch date. We determined that to get decent shots of a fast moving subject in what deceivingly appears to be a very bright light, made even brighter by the rocket fire, is bright only in comparison to the dark night that surrounds the launch tower. It is still artificial light, and it’s filtered by three miles of dense, humid Florida air. This situation called for shooting with ISO 800 at f/4 and 1/2000 sec. So we sat at the edge of our seats watching the news for the next few days. The lift-off happened at 11:59 PM on Friday, August 28. Here are the results of both days. 1. Before: 08/24/2009 11:55 PM 2. 08/28/2009 11:59:01:22 3. 08/28/2009 11:59:04:32 4. 08/28/2009 11:59:02:31 5. After: 08/28/2009 11:59:07:52 These images were shot at ISO 800 with aperture priority set at f/5.6 (images 2 & 3) and f/4 (images 1, 4, & 5) and shutter speeds that varied between 1/500 sec. and 1/2000 sec. Overall, the lift-off was spectacular and breathtaking. Peter Lapin and I were taken with the event. It was something we will never forget. Thanks Greg!
Back Light
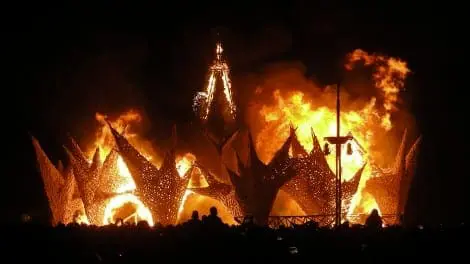
© Chris Michaels Whatever the source, backlighting can create interesting shapes from any subject in front of them. Usually in the form of a silhouette, the shape of the subject becomes outlined, adding mystery and contrast. In these conditions, it can take on a life of its own. In terms of subject detail, sometimes less is more. Try using the setting sun, nighttime lights or even a small campfire as a source.
Twin Towers of Light
© Frank Veronsky While I dread the anniversary of 9-11 every year, I have to say I relish the opportunity to photograph the beautiful tribute to those who have fallen. The Towers of Light are 2 beams of blue light that are lit every year where the Twin Towers used to stand. It is a magnificent sight and creates a very strong and lasting image in the minds of those who experience it and those who attempt to capture it’s beauty in the camera. For this image I was lucky enough to have access to my own fire escape on 14th street in NYC which provided a great vista. When trying to capture scenes like this I find the best time of day is just as the sun has set so there is still some light in the sky. You don’t want the sky to be completely black. And if you get lucky enough to have Some cloud cover they will provide extra color from the setting sun and interest to the composition. You will need to put your camera on a tripod and experiment with exposure. I find no one exposure is correct in situations like this. Longer exposures and lower ISO can provide you with greater depth of field and wispier clouds. Shorter exposures and higher ISO will provide less shake especially if it’s windy. Just remember the higher the ISO, the more noise you will get in your image, especially with longer exposures. I like to shoot with the lowest ISO possible. Obviously this will effect your exposure calculations. And if you can, always shoot RAW. That will give you all the information you could possibly need to make the best image. Once the image is captured I like to put it into Photoshop and maybe NIK Color Efex to get the most out of it. Colors adjustments, contrast, dodging and burning are all essential parts of making an image look polished. For images like this experiment with the Shadows/Highlight tool in Photoshop. It will help you get the most out of your dark areas and light. Try the Tonal Contrast and Contrast Color Range in NIK Color Efex. It will give you great detail in all areas of your image and enhance or subdue colors.
Capturing Lightning
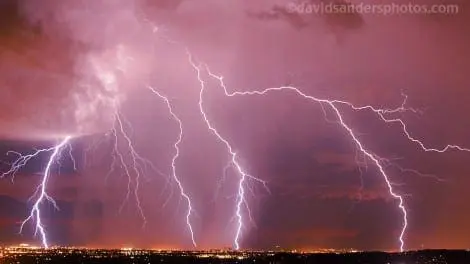
Photographing lightning is similar to shooting fireworks. Both require an open shutter which is a long exposure, but the trick is shooting at a large aperature or f/stop (smaller number like f/4). © David Sanders If you shoot at f/16, the lightning looks like thread on your photo and not very dramatic. This is a single burst of lighting (one bolt that flashed for brief second) and captured at f/5.0 at a 30 second exposure at ISO 100. I didn′t use a lightning trigger or similar device, just a long exposure, big aperture, and a little bit of luck.
Using Flash Outdoors in Daylight
There are a number of situations when using a flash outdoors in daylight is helpful. Its not mandatory, nor essential but can often help out a photo. If the sun is high (approx 11am to 3pm) and the person you are photographing is wearing a hat (like a ball cap) there will be a shadow on their eyes. You can use flash to lighten up the shadow, making their eyes more legible. © John Bentham There may also be scenes without people with shadows you want to lighten up with flash. The trick is to use it carefully, subtly, so it doesn’t look over lit and fake. If you are photographing a person who is standing in shade, but the background is brightly lit, you may have a difference in exposure of 3-4 stops between the person and the background. You can use flash to narrow the gap, close the difference in exposure, and narrow the difference in contrast. With outdoor portraits adding a flash outdoors produces a catch light in the eye. A catch light is the little sparkle of brightness in the subjects eyes, caused by the flash. It is a nice feature and gives the viewer a precise point to focus on when looking at the photo. Flash power, no matter how much you dial it up will NOT usually overpower the sun, unless youre using a large powerful, studio type unit. That means you should be using the flash to supplement the sun, not trying to use it to provide the main light. Determine the throw distance of the flash, how far the flash will work, the effective range of the flash. Typically this is only 10 feet on a little pop up in-camera flash, and maybe 20-25 feet for an external on-camera flash. Anything further away and the flash really wont do anything. © John Benthm Change the flash power, the output. To control the output of your flash use the +/- flash power adjustment and a little trial and error. This is usually available in the camera menu. The same feature is available on many external flash models. Determine your ambient exposure first (the regular exposure without using flash). Get a good exposure without flash and then add a low power flash to see the result. You then dial the flash power up or down incrementally to get the effect you want. Both photographs here are shot outdoors with fill flash which brighten up shadows and give the photo a bit more crispness and sharpness. The colors pop more with a little fill flash during the day.
Class In a Box: Silhouetting Subjects for Insertion into New, Different or Better Environments.
One of our advanced DPA classes focused on shooting small objects (tabletop photography) for use on eBay and other straightforward presentations. © Frank Siteman We made a small box, 13 inches wide, 12 inches tall and 24 inches deep, with sections of the sides removed and replaced with translucent sheets of vellum (note that simple copy paper would work just as well). Obviously, making a larger box of similar proportions, would allow us to shoot larger objects, say a football or toaster oven….or that lamp which aunt Sally wants you to help her sell on eBay. This set-up allowed us to create a soft, yet directional, source of light, which effortlessly enabled us to illuminate our subject. Moving our light source (we used regular 60 watt household bulbs) nearer or further from the sides of the box gave us control over the ratio of the lighting on our subjects. Shooting in RAW allowed us to achieve a perfect white balance. © Frank Siteman Another piece of paper, taped inside from the base of the box to the back of the box, served as our sweeping seamless background, resulting in an expensive professional look with a budget of mere pennies. After a fun and informative afternoon of shooting bowls of shells, dolls and other small objects which fit in the box, we concluded our day with a portrait of the class, shot outdoors. It was a nice portrait with everyone standing in a group. But we take photographs to have fun, and to that end, it just felt right to put the class into our box. This is where a little knowledge of digital manipulation can bestow on you great amusement,…or get you into great trouble. I opted for fun, and after outlining the group with the pen tool, created a selection, which I then placed on it’s own layer which was itself then placed onto (or into) the photo I’d taken of the box. Voilà, “class in a box”! Just another way to have a lot of fun with friends and photoshop!
Farmers Market Photography
There’s a Farmers Market near you! Every town has one. Every big city has several. They are typically held in a park or in the middle of a closed street on a Saturday or Sunday morning. Find yours and bring your point and shoot (P&S) camera. © Milton Heiberg Remain unobtrusive as a photographer, but active as a shopper. Bring some money and buy some of the beautiful fruits and vegetables—they’re good for you. If you come armed with heavy artillery cameras and don’t buy anything, most merchants will try to get you out of the way of the shoppers. But with a simple P&S camera you are not in the way, and you can carry the bag of veggies in your other hand. © Milton Heiberg The merchants will probably help you or even pose for you. Bring the heavy artillery if you have something special in mind, but you will be noticed as a photographer and not blend in as easily. This is one event where you would leave the tripod in the car. © Milton Heiberg Every picture here was taken with a Lumix TZ3 P&S camera set on “Normal Picture” or “Macro.” Most are a little more than studied “grab shots.” And because I was a customer, a bit of time-consuming studying was tolerated by both the merchants and the other customers. Some fruit and vegetable displays are very picturesque and it is almost impossible to make a bad picture. Then you just reach over the subject and take a “Hail Mary” shot with your eyes closed. Oh! Alright—keep them open. © Milton Heiberg If your pictures are for personal use, camera club competition, or even editorial (non-commercial) publication, you don’t need a model release. But it is safer to get one if you can. It is a good idea to carry several forms in your camera bag (or pocket in this case) for the impromptu occasion. You can print out a “Simplified Model Release” from ASMP at http://www.asmp.org/tutorials/simplified-model-release.html and re-word it for your specific needs.
Using a Reflector to Enhance Your Cook Out
© Joel Silverman A silver reflector can turn a snapshot into a professionally-lit photograph. An image like this has subjects in dark forest withbright mid-day lake scenery visible behind them. Perfect exposure for the subjects would mean "blowing out" the lake because the exposure range of the camera can′t handle such a great difference in brightness. By using a reflector to brighten up the subjects, their brightness level is closer to the background and so the contrast is lowered to a usable range.

