DPA Magazine
Create Drama
© Adam Stoltman, NY DPA Instructor Use silouhettes to create drama. The powerful outlines of New York′s 59th Street bridge and skyline are enhanced by the purposeful silouhetting of the buildings against the setting sun.
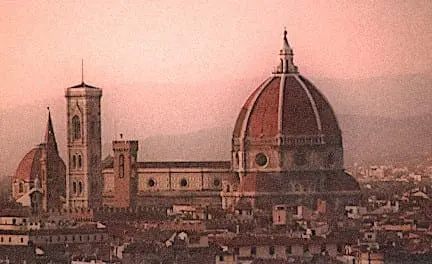
Back in Time
© Chuck Place Wanderlust is a wonderful word. It perfectly expresses my love of travel photography. It’s one big adventure. You never know who you will meet, what you will experience or what you will see. Some locations have been widely photographed, however, and in those locations I shoot the standard image and then try to put my own stamp on the photograph. Sometimes I will find an unusual angle or lighting, and sometimes I will make the image unique in post-production. This image of the main cathedral in Florence is a prime example of post-production. The warm sepia tones from evening light reminded me of an old photo, so I decided to carry it further. I duplicated the background layer and added Noise, found under Filters in Photoshop. I then duplicated the background layer again, dragged it to the top of the Layers pile and used Blur-Gaussian Blur under the Filters. To achieve the effect, I merely had to move the Opacity slider for the blurred layer to the left, reducing the blur affect, until the image looked the way you see it here. The amount of noise and blur you use has a lot to do with the original resolution of the image. Experiment and you will find the correct balance. Variations on this technique can give you grainy sepia toned images and photographs that look hand-tinted, if you de-saturate them. Pull out those old familiar images and rework them for different effects. It’s like traveling to that location all over again.
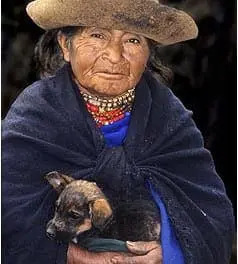
Travel Portraits
© Russ Burden Getting hooked on travel photography is kind of like the chicken or egg debate. Which comes first - the desire to travel which leads you to record what your experience or were you already involved in photography which encouraged you to travel to get images of certain locations? For whatever the reason, the two go hand in hand. A favorite subject of many photographers when they travel is people. Whether it’s a family member, travel companion, or the native people of the area, capturing a good image allows you to relive your experiences in a positive way. Many options await the eager travel photographer with regards to photographing people. Tightly cropped portraits, wide angle environmental shots, small or large groups, candids, posed formal shots, you get the idea. Use these options to create diversity in the images you bring home to create a memorable album or slide show. © Russ Burden Tight head shots of faces with strong character lines and personality should appear in every travel photographer’s shows. If you’re trying to capture candids, a long lens is beneficial as it allows you to shoot from a distance. But I encourage you to interact with your subjects and to not rely on candid grab shots. If you’re in a foreign country and don’t speak the language, gesturing to people you’d like to photograph can go a long way to getting “the shot.”
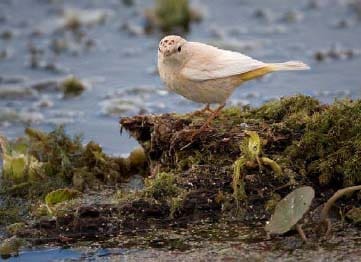
Patience and Persistence
While wandering around the Orlando Wetlands park with my students during the park’s annual festival on February 7, 2009, I came across an odd-looking bird that would later be IDd as a Leucistic Palm Warbler. I knew this was a rare one, and later discovered that the chance of seeing one was one-in-ten-million. The longest lens I had with me was a 70-200mm zoom. So when the morning’s field trip was finished, Joe Puglia and I when back to the spot where the bird was feeding—this time armed with 500mm lenses and 2X extenders. We spent more than two hours stalking and photographing this bird. The time proved to be well spent. The bird was skipping along the logs, lily pads and water lettuce at the shores of a pond. Its main territory was about 200 yards of prolific insect life. After a while the bird became familiar with our presence. By staying low (knee pads help a lot) and moving slowly we were able to get close enough to get some good candid behavior shots. Then by picking the bird’s favorite spots, with the best backgrounds, we eventually got the images we were looking for. Here are twelve of them showing every part of the bird.
Turn On Your Night Light
Digital photography has opened many doors for trying anything and everything new. It allows a photographer to try new methods, experiment without risk of the unknown, and simply play. Unrivaled in this regard is the shooting of night and low light scenes. No longer do we need to wait until the film is developed to see if the exposure was correct or if an effect worked positively. Simply fire away and adjust on the spot. Additionally, with merge to HDR software getting better all the time, the range of tones that can be captured in a scene is almost limitless. Technical Considerations: Check your camera manual to see if you have Long Exposure Noise Reduction. If so, turn it ON as it will save you time in front of the computer trying to get rid of noise and grain in the image. While it does add in camera processing time, it’s well worth the wait. Use a tripod to ensure you’ll get a sharp image during the long time the shutter remains open. If you intend to bracket for merge to HDR images, using a tripod will help ensure the images properly overlap and remain in register when imported into the software. Use a cable release to prevent jarring the camera. © Russ Burden Add More Light: A technique that’s fun to try is called Light Painting. It can be done using a flash or with a powerful flashlight. I prefer the flashlight technique as it adds a bit of warmth to the scene due to the color temperature of the light vs flash. With the shutter open for approximately 30 seconds, “paint” the primary subject with the light by “brushing” the beam over it using many even and consistent passes. At the end of the exposure, let the file process in camera and check the effect on the LCD. Adjust the time of the painting and duration of the shutter speed accordingly after looking at the result and the corresponding histogram. Use Brightly LIt and Colorful Subjects: Find subjects that emit a lot of light and color. Most major cities have an area where this can be found. A mall at night is also a good option. The most magical time at which to start shooting is just before the sky gets black. This twilight time works well in that natural light provides separation between the structure and the sky. Keep shooting when the sky goes black as you’ll still be rewarded with great images. © Russ Burden Create Effects: Night photography is unique unto itself but taking it a step farther can provide you with many fantastic photographs. A standardly used effect is to zoom the lens during the exposure. Experiment with zooming the lens quickly or slowly, zooming from the wide to telephoto setting or visa versa, or leaving the lens at a fixed focal point for part of the exposure and zooming for just a portion. Once you’re done zooming, don’t overlook photographing portions of the structure rather than the entire facade. Try multiple exposures or deliberately moving the camera during the exposure. Let your mind wander to places and techniques you’re never tried. Remember, it’s digital and the results are but a glance away from the LCD. © Russ Burden To learn more about this topic, join me on one of my Photographic Nature Tours. Visit russburdenphotography.com and click on the NATURE TOURS button for more information. Also, pick up a copy of my new book, Amphoto’s Complete Book of Photography. You can purchase a signed copy directly from me or visit your local book store or Amazon. Contact me at [email protected] to order yours.
Leave a Little Color
Denver DPA Instructor Russ Burden shows how to convert your color files to Black and White but leave a splash of color for impact:
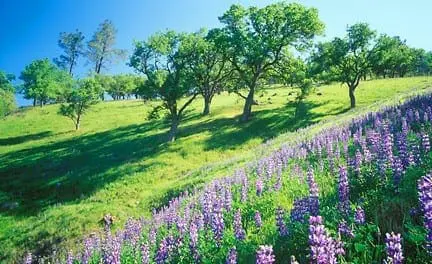
Wildflowers
© Chuck Place Spring wildflowers are a welcome sight in Southern California. Not only are they beautiful, but it means we have received enough rain during the past winter so that drought is not an issue. The mountains behind Santa Barbara often develop great carpets of purple lupine in late March after a wet winter. I like to use a compositional technique called forced perspective to create an exaggerated feeling of depth in an image and to accentuate the foreground subject. In this case, I placed my camera close to the lupine and just above the height of the blooms. Quarter backlighting gave me saturated colors and dramatic shadows from the oak trees on the hillside. Spring wildflowers are one of my favorite subjects and I often find myself shooting from the more interesting perspective of ground level
How to Achieve Soft Focus in Your Background
To achieve a soft focus on the background, I needed to use a very wide lens aperture which in this case was f3.5. My shutter speed was 1/30 of a second which required a very still subject and camera to prevent blurring. I didn′t have a tripod, so holding the camera close to my face and "locking" my arms into my chest was necessary to keep the camera steady. In order to quickly focus on the butterfly, I switched to manual focus mode so I wouldn′t need to use the "lock focus and reframe" technique. For a shot like this I find good old manual focus to be easier. Taken with a Panasonic Lumix DMC-L1 © Alex Lippisch
A New Angle
© Rick Wright For those of us in colder climates like Philadelphia, winters grays still linger. If you haven′t warmed up yet either, consider looking inside for colorful Spring photographs. In my case, I was watering an Amaryllis for months and it happily woke up once the sun started reaching it. In the first photograph, I concentrated on the incredible red hue in the flower and isolated it from its background with a shallow depth of field (ƒ4). © Rick WrightOnce I got past the initial beauty of the flower, I looked downward and composed an entirely different shot! Can the shadow itself be a good subject? Absolutely! Think about challenging vantage points at all times, especially when faced with a scene of great beauty.
Use Camera RAW White Balance to Create Moods
Serious photographers know that capturing the image is simply the first step in the digital process. Most tend to capture in RAW. It provides options that jpg captures can’t. One of these relates to white balance. Striving to get the proper white balance is high on all photographer’s minds. So much so, camera manufacturers put a lot of R&D money into making sure that each and every camera body that rolls off the assembly line provides specific color parameters relative to the white balance setting the photographer chooses. While some photographers prefer the warm look of a Cloudy setting, many simply leave the white balance on Auto and tweak the look in camera RAW. This is what got me thinking about the topic of this article. Rather than simply tweak the color, why not go all out and create a totally new look to the capture? Experimenting with white balance is not something that will work with every subject. The obvious is with people. Purple and blue skin tones aren’t natural. On the other hand, if the end result is to create a special effect or to grab the viewer’s attention using a contemporary twist, go for it. Should you choose to go this route, make sure the entire image fits the look rather than having it appear to be a mistake. To get started with your white balance experimenting, I suggest you go through your files and pick out a few pics of multiple subjects. Make copies and place them in an appropriately named folder. Open them in your camera RAW converter and begin to play using the various color pull down options - see the screen shot as a reference. Subjects that make good starting points are silhouettes and night time scenes. As a quick reference, here’s a basic description of each setting: As Shot: the color is based on how the camera was set at capture Auto: the RAW converter chooses what it thinks is proper Daylight: accurate color as if shot during mid day hours Cloudy: similar to daylight but more yellow Shade: similar to cloudy but with even more yellow Tungsten: heavy emphasis toward blue Fluorescent: heavy emphasis toward magenta Flash: close to daylight with a bit less magenta Custom: Changes as soon as any of the above defaults are tweaked Take a look at the results of the accompanying images. As you can see, the entire feel of the image changes based on the chosen white balance. The As Shot version provided a great capture with very neutral hues and was representative of what existed at the time I pressed the shutter. In playing with the pull downs, I next went to Shade. As described above, the image took on a much warmer yellow hue. In converting the image to Tungsten, a strong blue color was imparted to the image. If you were looking to create a moonlit appearance, it would be a great setting to use. Finally, the Fluorescent setting produced an image with a magenta cast. Try using it for sunrises and sunsets to add warmth to the scene. To learn more about this topic, join me on one of my Photographic Nature Tours. Visit russburdenphotography.com and click on the NATURE TOURS button for more information. Also, pick up a copy of my new book, Amphoto’s Complete Book of Photography. You can purchase a signed copy directly from me or visit your local book store or Amazon. Contact me at [email protected] to order your signed copy


