DPA Magazine
Shooting Snow
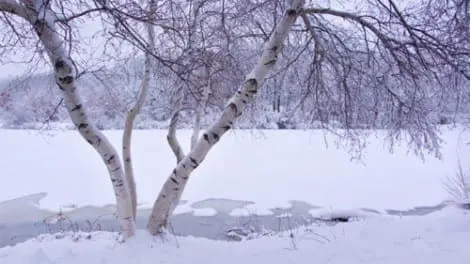
The first few hours after a snow has fallen are magical times. The snow is pure. The only tracks in the snow are from moving twigs scraping the surface of the snow or the fragile tracks of birds and other small animals. They belong there. You’re honored to be seeing something that is so beautiful, clean, pure and private. Photographing a scene can be a spiritual event, but there are a few aesthetic and technical issues to bear in mind to help make the overall experience a positive one. © Frank Siteman The first should be attention to the light and in determining the proper composition and exposure, but the really important thing is to keep both yourself and your equipment warm and dry. ALWAYS keep a spare battery (in a sealed baggy to keep it dry), in a warm inside pocket, and if possible, keep your camera itself under your coat. Cold weather can drain a battery in an amazingly short period of time. The use of chemical hand-warmers, usually found at sporting good stores or on the impulse-buying racks at the checkout counters of Home Depot, are an essential of cold weather shooting. These little packets typically contain cellulose, iron, water, activated carbon, vermiculite and salt and produce heat from the exothermic oxidation of iron when exposed to air. They create a safe, long-lasting and significant amount of very useful heat. © Frank Siteman I typically have one between my hand and the camera’s battery compartment while out shooting in cold environments, as well as one in each of my mittens. Of course, you’ll want to check your histograms carefully after every shot, remembering to keep the histogram accurate to the scene it represents. Additionally, shooting in RAW should be a major part of your workflow. With the controls of Camera Raw (or Lightroom),you really put yourself in the driver’s seat, From there, you can choose to balance the snow to neutral or give it a hue of your chosing, all the while preserving continuous tones in 16 bit, assuring that your final files will create stellar prints free of banding. © Frank Siteman
Shoot Into the Light
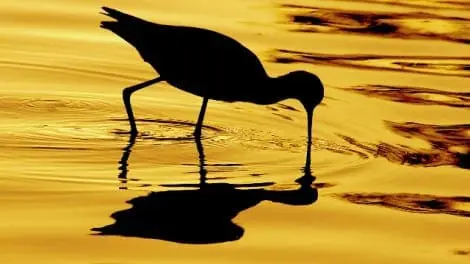
While leading my nature photo tours, participants often hear me say, “It’s all about the light.” Whether it’s the soft warm glow of sunrise / sunset, directional side light that enhances a landscape, soft overcast light that works so well for photographing people, or direct front light, the bottom line is the quality of the light is of great magnitude in determining the success of the image. Regardless of the direction from where the light originates, learning how to read it and knowing how it will impact a subject is essential to becoming a better photographer. Of the three primary lighting directions, backlight is the least often used as it presents challenges that are difficult to overcome. However, when used properly, backlit images have a tremendous amount of impact and seem to pop off the page. ©Russ Burden Beginning photographers often hear that they should avoid photographing backlit subjects. The classic stereotyped message they’re told is to shoot with the sun behind their back so the subject is front lit. While this does hold validity in that it presents a situation to easily obtain proper exposures, the light is flat and lacks interest. Backlighting is so much more intriguing and exciting. The purpose of photographing a backlit subject is to make it glow as the subject is rim lit in a halo of luminance. If the subject possesses translucent qualities, the effect is enhanced as it appears to be lit from within. Another purpose is to silhouette the subject to emphasize its shape and form. Make sure the background is strong, simple, and has a lot of color to prevent it from distracting the viewer from focusing on the outlined subject. Challenges - Exposure and Flare:Exposure: If capturing a silhouette is the primary focus of the image, take a meter reading from the area behind the subject. In the accompanying image of the bird in the water, I simply took a reading off the water in an area where there was no glare reflecting off its surface. I locked that exposure into the camera by pressing half way down on the shutter, recomposed the image and then made the picture. In a situation where the primary silhouetted subject takes up a large portion of the frame, the above technique becomes imperative or else the resulting image will be overexposed. The camera reads the large black silhouette thinking it needs to falsely open up the exposure and the result is a gray silhouette with an overexposed background. When in doubt, if the shooting situation makes it practical, bracket the exposure. If it remains consistent, compensate the exposure to the minus side. ©Russ Burden Flare: If the sun shines directly into the lens, the chance of getting a flare spot in the image is greatly increased. The use of a lens hood becomes essential to lessen the chance. But sometimes this isn’t enough. Stop the lens down and press the depth of field preview button as this will reveal if flare is impacting the picture. If so, carefully place a shadow across the front of the lens with your hand, a hat, newspaper, etc. The trick is to create a shadow across the front element without getting the item that creates the shadow in the image. If possible, find an element in the composition that minimizes the potential by placing the sun behind it as in the accompanying photo of the tree, rock monolith, and sun. ©Russ Burden To learn more about this topic, join me on one of my Photographic Nature Tours. Visit www.russburdenphotography.com and click on the NATURE TOURS button for more information. Also, pick up a copy of my new book, Amphoto’s Complete Book of Photography. You can purchase a signed copy directly from me or visit your local book store or Amazon. Contact me at [email protected] to order your signed copy.
Photographing Disabled Kids
Atlanta speech therapist Lauren Zimet works with kids with autism, cerebral palsy, and Down Syndrome. She wanted photographs that showed that even kids with the most profound disabilities can express feelings of joy and accomplishment. I interviewed her about her methods, and when she mentioned that she teaches kids to blow bubbles as a way of developing oral motor skills, I knew the subject of my main photo. Because the speech clinic had little photographic interest, I took Lauren and her patient out of the clinical setting to a forested park. I shot in the middle of the day under heavy tree cover, with a large silver reflector to fill in the shadows and separate the subjects from the background. A shallow depth of field also was important because the location was chosen for its simplicity, not because of any association with the subject. Because I was on a tripod, I was able to use the bubbles from four different frames, filling the image with dozens of bubbles when in fact each frame had less than ten bubbles in it. © Joel Silverman © Joel Silverman
Photograph With Your Heart
"Need" - some people need what is obvious: food and shelter. This baby girl is under-nourished. The home she shares with mother and brother is a hut, with holes that let the rain in. There is no indoor plumbing. No running water. No cooking facilities. Their hope for survival comes from begging from others who have little more. The mother probably trades food for sex and probably is not mentally stable. But then who would be under the circumstances? The family lives on a Batey in the Dominican Republic. These are the huts, and cinder block houses where the sugar cane cutters and their families live. Most of the cane workers are Haitian for whom this represents a slightly better life. Their need? To be seen by the world. To have people know that they exist, that they are not so lost that no one will ever find them. Beyond or above that? Enough food, clean water and shelter without holes. And an education for their children, and a way out of the cycle of extreme poverty. Something that says there is an end to this cycle somewhere. TIP? My tip is to keep one′s eyes and heart open. Photographs often happen where the heart leads you. Don′t take the picture. Make the picture in tandem with the subject. Be aware of what life the other person is living and how you are living and what are those differences. Don′t mistake simple for uninformed. www.bateyrelief.org © Hinda Schuman
Flashes Of Hope
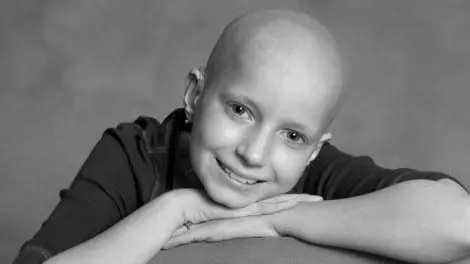
I have been photographing young cancer patients pro bono for a group called Flashes of Hope. Some of these children won’t make it through their illness, but the idea of having a professional portrait taken brightens up their day. And Flashes of Hope provides free black and white prints for the families to treasure. The photo shoot happens at the hospital. If the children are confined to their rooms due to their immune systems being weakened, I’ll go in with a gown and gloves and try to make a portrait that doesn’t show the hospital environs. Other times, we’re able to set up a backdrop and lighting and the kids feel like movie stars! The head of the oncology program at one hospital made a point of thanking me saying that this kind of positive energy for these kids is invaluable in their recovery. © Kathy Tarantola © Kathy Tarantola © Kathy Tarantola © Kathy Tarantola
Fetching Water
This image is a Batey in the Dominican Republic - it is the children′s job to fetch water from the communal spigot. The water is not very clean, but still it is better than walking a mile to another Batey if yours does not even have a spigot... My tip is to keep one′s eyes and heart open. Photographs often happen where the heart leads you. Don′t take the picture. Make the picture in tandem with the subject. Be aware of what life the other person is living and how you are living and what are those differences. Don′t mistake simple for uninformed. © Hinda Schuman
Shooting From the Ground
Photo Location: Oakland Cemetery in Atlanta, GA Photo Tip: Joel Silverman held an Advanced Photo Shoot at the nearby Oakland Cemetery where his students learned new techniques in architectural and landscape photography. One idea is to shoot from different angles, as the image herein was, as to create a more haunting effect when the shot comes from the ground up.
Rule of Thirds by Rick Wright
It′s not just "another Fall in Philadelphia," as sung by Hall and Oates. This season brought rich color and remarkable sunlit days for much of the season. While walking in Center City one afternoon, I was struck by these brilliant yellow leaves across the street. I made several exposure showing the tree and city in its entirety and simply wasn′t satisfied. I crossed the street where picture really started to take form while shooting straight up from below the yellow canopy. Instead of framing against just a pure blue sky, I maneuvered myself to a place that caught a modern glass building in the frame. Now, with so much texture, and limbs, and windows it would be smart to organize the frame as well. Rules of 1/3rds to the rescue! I put the twisting trunk at the rightmost 1/3rd, and gave a peak through to the building at the intersection of the upper left 1/3rd. You′ll notice the tree essentially frames the building looming in the background. As an added bonus for shooting straight up, the colors in the image were simplified to just blue and yellow—allowing the building and sky to seemingly merge. Hall Oates © Rick Wright
Yes, We Can!
© Darren Hauck Check out the Campaign Trail images of President-Elect Barack Obama, taken by photojournalist Darren Hauck, who is also one of our Chicago Instructors. Darren will soon be sharing his expertise in a Street Photography Workshop in Chicago that will provide tips on capturing Chicagoans on the go during holiday season. © Darren Hauck © Darren Hauck © Darren Hauck © Darren Hauck © Darren Hauck © Darren Hauck © Darren Hauck © Darren Hauck © Darren Hauck
Flaming Rosetta
I was hired recently to do a promotional shot for a new coffee house in Philadelphia that was gaining a lot of attention for their perfectly brewed coffee. They requested I come by and get a shot of a freshly minted rosetta (foam art) by the shop′s favorite barista. The shoot couldn′t be done in my studio (with controlled lighting), so I had to think a bit on my feet. In addition to working with the available indoor lighting, I was also under a time pressure to get something recorded before the rosetta fell apart in the foam. By the third latte, I settled on using their gas fireplace (looks real doesn′t it?) as a backdrop. © Rick Wright I shot a middle aperture (ƒ8) to get most of the cup and saucer in focus (while using a 100mm lens). A faux crocodile bench acted as a "table". After I got this shot, I realized how nicely the background flames paralleled the similar flame-like shapes in the rosetta itself. Other than ambient light, I did place one more lamp high up shooting down on the coffee cup. This image later appeared in Philadelphia Style Magazine.


