March 2026 DPA Newsletter
March 2026 DPA Newsletter:
NEW INTERVIEW with 9/11 Survivor & Photographer David Handschuh,
Expert Tips on Photographing Spring,
New Class: A Semi-Private Introduction to Beginner Cellphone & Digital Camera Photography for Two,
“Alternative & Creative Lighting” Photo Workshop by Rick Friedman,
March FinerWorks Winners!

Photo by Patrick Reed, Digital Photo Academy instructor in Detroit.
March brings measurable shifts in shooting conditions: daylight extends by a few minutes each day, the sun climbs higher at noon, and shadow angles change week to week. Early blossoms and fresh foliage brighten backgrounds, while fast-moving weather can swing scenes from harsh sun to flat overcast within hours. Precision timing, careful background control, and rapid exposure adjustments are essential.
Digital Photo Academy is pleased to bring you the latest updates and photography inspiration in our monthly newsletter. This is all made possible by our valued sponsor, Finerworks.
NEW INTERVIEW:
Meet the Photojournalist Buried in Rubble on 9/11!
New Interviews with Award-Winning Photographer David Handschuh | Celebrating Senior Shutterbug Champions
Our Celebrating Senior Shutterbug Champions interview series continues with David Handschuh: longtime staff photographer for the New York Daily News, award-winning visual journalist, writer, and NYU educator.
On September 11, 2001, David was photographing the World Trade Center when the South Tower collapsed. He was critically injured, buried in debris, and survived.
Watch the first part here, with more parts to come! Plus, subscribe to our YouTube channel and email DPABooking@digitalphotoacademy.com as proof to receive a free 2-hour online lecture on photo composition!
In our conversations, David shares:
– What it was like photographing 9/11 from the ground
– How the experience affected him
– Lessons from decades covering New York City
– The mindset behind powerful storytelling images
– Advice for photographers at every stage
David’s career includes multiple Pulitzer Prize nominations and honors from the National Press Photographers Association and the New York Press Photographers Association.
Celebrating Senior Shutterbug Champions highlights accomplished senior photographers whose images helped define their era. They continue to create, teach, and inspire today.
Primer of the Month:
Expert Spring Photography Tips
Featuring images from Digital Photo Academy instructors from coast to coast.
Each month, we share a primer with insights from our instructors across the continent. It’s a chance to learn from experienced photographers and see how they approach their craft, through tips, advice, and a behind-the-scenes look at their photography.
Photographing in spring can produce beautiful results, but strong images come from paying attention to timing, light, and background control. Blooming trees, fresh greenery, and longer daylight hours offer great opportunities. However, they also require careful framing and exposure decisions.
This month, DPA instructors share real-world tips and images on photographing in spring conditions and photographing spring subjects.
1) Mark Conwell, Digital Photo Academy instructor in Dallas

This picture was taken with film and is of the Texas Bluebonnets, in the Fort Worth Nature Preserve. I had a Tripod not far off the ground.
When I saw the field of bluebonnets, what caught my attention wasn’t just the color, it was the single cluster of red Indian paintbrush breaking through all that blue. I knew the contrast would only work if I kept the frame simple, so I set my tripod low to the ground and shot at flower level rather than standing above them. That lower angle lets the flowers fill the frame and creates that soft, layered look as they fade into the distance.
Because I was shooting film, I slowed down and paid close attention to focus and depth of field. I focused on the red flowers so they would anchor the frame, and let the bluebonnets gradually soften toward the background. That shallow focus keeps the image from feeling busy even though there are hundreds of flowers in view. The slight blur in the foreground and background creates depth and keeps your eye settling right where I intended—that pop of red surrounded by blue.

When spring comes, take a trip to the Zoo! This shot is of a 3 month old Cub with its mom in the Fort Worth Zoo, I had gone to the zoo to get pictures of the 2 cubs but they were not out the first couple of trips. There were a lot of kids and glass, so I used a Canon R8 and a Canon 90X400 Lens to shoot over the children and through the chain link fence to get this picture.
Instead of trying for an action shot, I waited for a quiet moment. When the cub settled near its mother and she leaned in close, I focused on the cub’s face but made sure the mother’s expression was visible too. The longer focal length helped blur the background and minimize the fence, making it feel more natural and intimate than a typical zoo photo.
What makes this frame work for me is the contrast between scale and expression; the cub looking outward, alert and curious, while the mother rests calmly behind it. It feels protective without being staged, and that moment of stillness is what I was waiting for.
2) Eric Tilson, Digital Photo Academy instructor in Cleveland

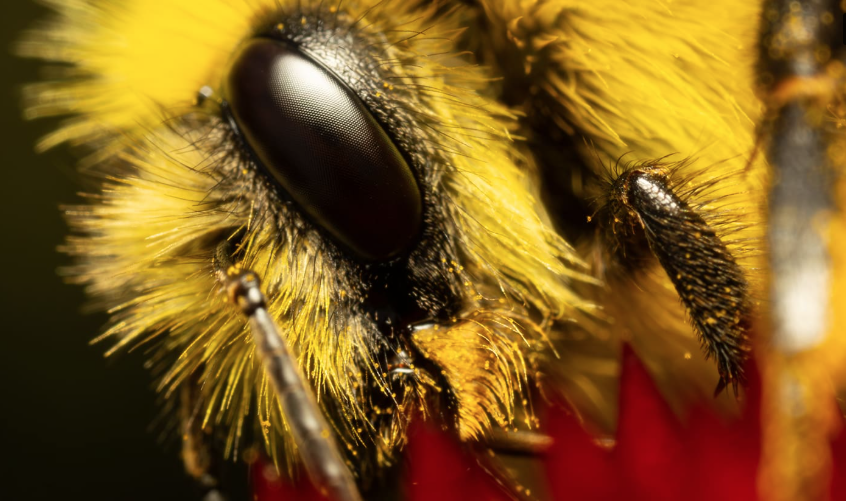
As insects begin to become more active in the Spring, I spend a lot of time walking around my yard staring into bushes (and making my neighbors think that I’m a bit strange). Whereas you may need to drive to a specific park or lake to find larger birds and mammals, you can find beautiful insects just about anywhere. However, unlike most photography, for which you can get great photos with just about any modern lens or camera, unfortunately, for insect photography gear can be very important.
To get a close-up of an insect, you’ll need a lens with very close focusing abilities. Though it seems like a giant telephoto lens would work great, they are often awful for insects because their minimum focusing distance is very long. For example, my longest lens is the Canon RF 800mm F11. It is miraculous for animals that are far away, but it can’t focus on anything that is within 19.7 feet of my camera!
For the best resolution and detail, nothing beats a dedicated macro lens for insects. For both of these shots of bees, and for the portrait of the jumping spider, I used the Laowa 25mm f/2.8 2.5–5x Ultra Macro lens. That is a completely manual, very specialized lens that can only take ultra close-up shots and is useless for anything else.

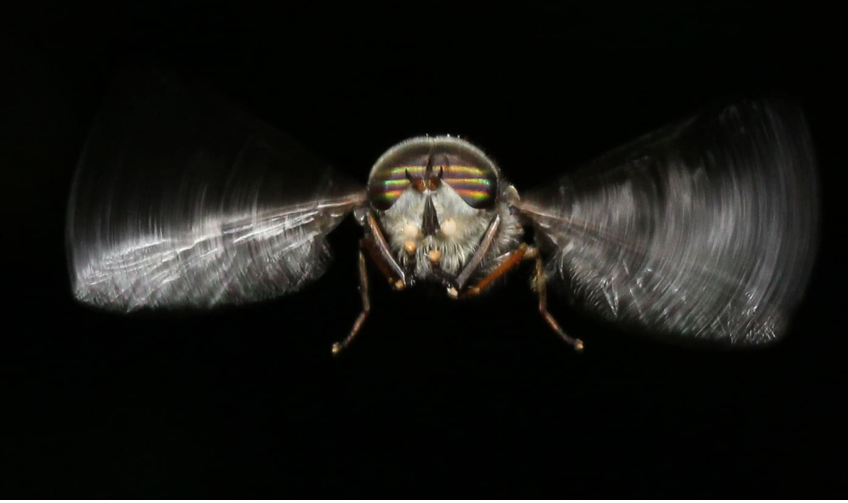
To start out, I would recommend a 100mm f/2.8 macro lens. All camera companies make one that is relatively affordable compared to other lenses. You can then get even closer to your subject by attaching extension tubes to any lens. For example, I used the Canon 100mm f/2.8 lens with extension tubes to photograph the hovering horsefly.
Another option is to buy a reverse ring, which literally allows you to turn a non-macro lens around backward and connect the “front” of the lens to the camera. The somewhat common 50mm f/1.8 lens works well for this. The reverse ring allows for very close, completely manual focusing as well, but it can be tricky to set the aperture on your lens.
Finally, the close-up abilities of modern cell phones are amazing. For example, my iPhone 16 focuses within an inch of the subject. So, there is no doubt that my phone would capture far more detail on a docile insect than the 800mm lens that I mentioned above.
Because you are so very close to the subject in macro photography, any movement of the insect or of the photographer will be magnified in the photo. Therefore, a flash is vital for many macro photos, since it will allow for a high shutter speed, and the flash itself helps “freeze” action. To spread and diffuse the light of the flash, it is best to use a diffuser as well.
To get close-up portraits of an insect, I almost always follow the same steps:
1 – I manually focus my macro lens to its closest focusing distance. On my lenses, that means turning the focusing ring completely to the right, but that may be different on your lens.
2 – I find a leaf or a twig, and I set my shutter speed and flash by taking test shots of these stationary objects.
3 – I hold my camera near my face while searching nearby leaves and webs for an interesting subject. When I find an insect, I approach it as slowly as possible without making any quick movements. Because I have already set my focus manually to be at its closest possible focusing distance, I focus on the insect simply by moving my own body closer to the subject. Moving even a millimeter changes focus drastically.
When I see that the insect is in focus, I take my first shot. If the insect doesn’t move, I move very slightly and take several other shots from different distances. The depth of field is so tiny from close-up that just one row of lenses on a fly’s eyeball may be in focus. As you can see in my shot of the jumping spider, though his eyeballs are in focus, his mandibles are almost completely out of focus, though they were a fraction of a millimeter closer to my camera.
A few pieces of general advice:
1 – Try not to have any preconceived notions of what will look amazing from close-up. Macro photography quite literally opens up a “whole new world.” So many bugs are covered in beautiful patterns with metallic colors and have gorgeous eyes. However, be forewarned that if a housefly allows you to get close enough for a macro portrait, it may give you nightmares — those guys are definitely not colorful and metallic :).
2 – Insects are much more docile in colder temperatures. I have gotten my best shots at dawn before the sun has heated things up much.
3 – To avoid movement, it’s best to press the shutter button while holding your breath. But don’t forget to breathe! Sometimes I get carried away and end up very out of breath.
4 – Finally, I want to point out that I have spent hundreds of hours photographing insects, and not one has ever acted in an aggressive manner toward me while they were on flowers or plants. However, they are much more unpredictable near nests, hives, trash, and human food.
3) Jerry Williams, Digital Photo Academy instructor in Dallas

The waterfall photo was taken at the Tahquamenon Falls in northern Michigan.
Settings were f/11, shutter speed 200, ISO 200, handheld, about 2:00 in the afternoon in July. The shutter speed is fast enough to freeze the motion of the waterfall, so the water appear crisp with visible droplets and texture rather than smooth or silky. Shooting handheld at that speed also avoids camera shake.


This flower photo, lizard shot, and butterfly shot were done with a macro lens!
Settings were f/8, shutter speed 200, ISO starting at 400 and adjusted for lighting conditions.
With macro photography, you need a steady hand, and for some shots you need a tripod. Lots of practice is required to remember that even if you’re at f/8, if you move closer to your subject, your depth of field will get smaller.
4) Dave Rhodes, Digital Photo Academy instructor in Atlanta
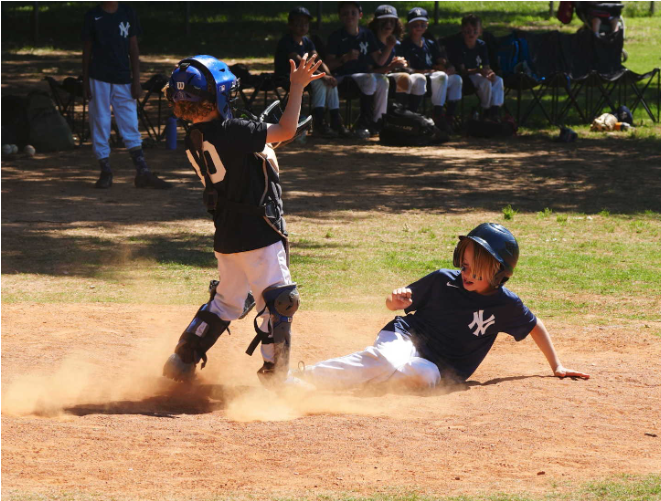
Little League baseball — Sony A1, Sony 70–200 F2.8 GMII, ISO 1000, 200mm, F2.8, 1/4000.
Springtime is here, and that means baseball season is right around the corner. It’s a great time to photograph the kids or grandkids playing baseball or softball to hone those sports action skills. You can do this with almost any camera with a telephoto lens. It doesn’t have to be a long telephoto lens. That’s the beauty of shooting Little League — most of the time, you have great access to the action.
I shot this of the neighbors’ kids on a Saturday morning. The side benefit is that you can share your photos with them and look like a hero while learning a great photographic skill.

Yellow Daisy shot with a Sony A1, Sony 70–200 F4 G with Macro. ISO 100, 1/3200, F4 in Macro mode.

Black-eyed Susans — Sony A1, Sony 70–200 F4 with Macro. ISO 100, 1/1250, F4 in Macro mode.
Summer is almost here, thank goodness! And it’s time to get outdoors and use your cameras. When taking macro pictures, you don’t necessarily need to have a macro lens. With many zoom lenses, you can shoot the subject in “close-up mode” or at minimum focus. Many times, a “close focus” lens and a little creative cropping in post can reveal an acceptable shot.
If you set your zoom or any prime lens at its minimum focus and look at the lens, it will show you the distance you get to shoot your subject. That’s what I did with both of these flower shots. A wide-open aperture will result in that beautiful bokeh in your shot. Bokeh is the aesthetic quality of the out-of-focus or blurry areas in a photograph.
5) Steve Dunwell, Digital Photo Academy instructor in Boston

In April, the Boston Marathon is always crowded, but there are only two places where you see many runners closely bunched together: at the start, and at the next-to-the-last turn, from Commonwealth Ave onto Hereford Street.
To get this angle, I brought an 8-foot stepladder to get over the crowd and locked it to a lamppost nearby five hours early. Then, I returned an hour before the lead runners came, unlocked the ladder, set it up, and waited.
The first runners come in early, and the dense packing comes 1/2 hour later. Panning with the motion at about 1/10 second to get some detail to show personality
6) Ken Ross, Digital Photo Academy instructor in Atlanta
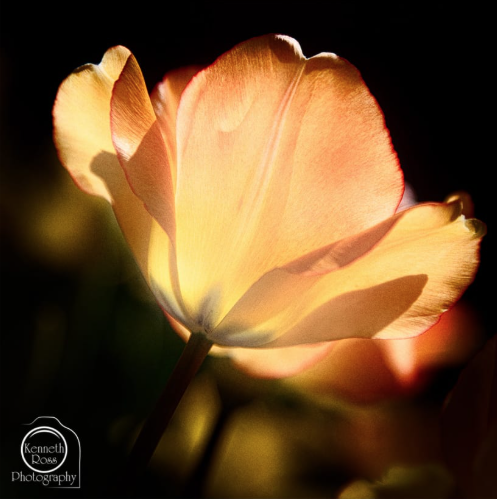
In this photo, a simple flower turns into something almost magical just by changing where the camera is placed and how the light is used. Instead of photographing the blossom straight-on, the view comes from low and slightly behind it, letting the sun shine through the petals. That backlighting makes the flower glow from the inside and reveals delicate details—soft ridges, thin layers, and subtle textures—that usually disappear in everyday snapshots.
Notice how the background falls into deep shadow. That isn’t a filter or heavy editing—it’s what happens when you expose for a very bright subject. The result is bold contrast: a bright “lit” flower floating against a dark, quiet backdrop. The composition adds to the energy, too: the flower sits on a diagonal, and the stem works like a natural guide that pulls your eye straight up into the bloom, like a little burst of garden fireworks.
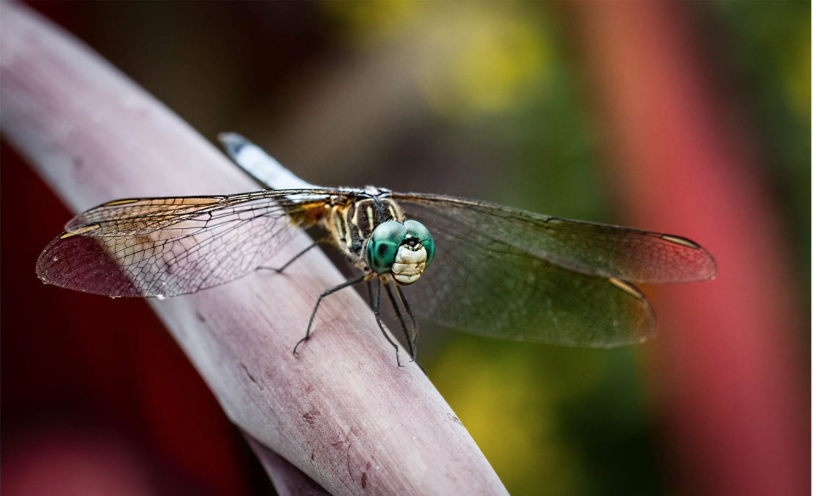
This little guy has big “get off my lawn” energy—that grumpy, old-man face is just perfect, especially with those cool teal eyes pulling you straight in.
What really makes the shot sing, though, is the overcast light. No harsh glare on the wings, no blown highlights on that shiny head—just clean, even illumination that lets all the micro-details show up: the lacy wing veins, the subtle texture on the thorax, and that crisp edge where the body pops off the background.
Composition-wise, the dragonfly’s perched on a strong diagonal that acts like a visual runway, and the soft, creamy background blur keeps the frame uncluttered so your eye doesn’t wander. It’s the kind of scene where a small shift—angle, distance, focus point—can be the difference between “nice bug photo” and “wow, this has personality.”

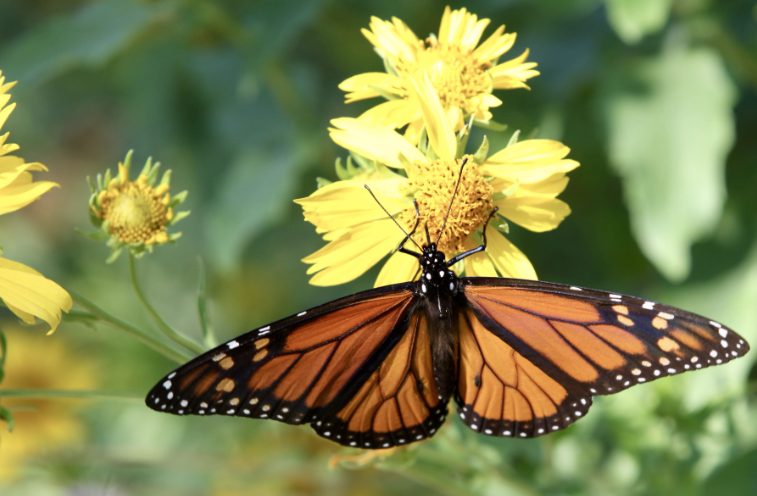
This little moth will always be the one for me — the very first image I ever captured with my first Canon Rebel DSLR. I’d spent decades shooting film, but this was the moment that experience finally “translated” into digital: finding focus fast, getting close without spooking the subject, and letting the background fall away into that soft, painterly blur.
Even with the humble kit lens, it was more than enough to freeze a tiny moment in time — warm wings dotted with detail, bright blooms glowing like embers, and that satisfying snap of sharpness right where it counts. It’s a reminder I still love: great photos don’t start with expensive gear… they start with seeing the shot, and knowing how to make the camera match what you saw.
7) Patrick Reed, Digital Photo Academy instructor in Detroit

When I stepped into this street, what struck me wasn’t just the crowd; it was the density and direction of everything. The tables, signs, and overhead lights all pulled inward toward the center. I positioned myself directly in the middle of the walkway so the lines of the street would lead straight down the frame and create depth.
I chose to convert this to black and white because the color would have been overwhelming. There are neon signs, food displays, and mixed lighting everywhere. In color, the image would compete with itself. Removing color simplifies the scene and shifts the focus to contrast, light, and gesture instead of distraction.
The overhead lights create strong highlights along both sides of the street, while the center walkway falls slightly darker. That natural contrast helps guide your eye toward the distance. I waited until people were spaced in a way that felt layered rather than cluttered—figures in the foreground, midground, and background—so the crowd feels full but still readable.
What makes this work for me is that it feels busy but structured. The symmetry of the street gives it order, and the black-and-white treatment turns the chaos into something graphic and intentional rather than overwhelming.
8) Larry Edward Smith, Digital Photo Academy instructor in Chicago
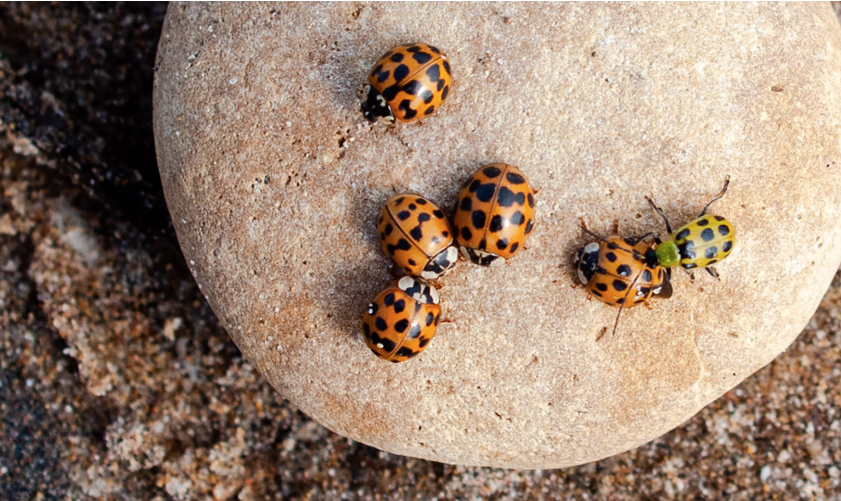
Generally, what makes my photography work is strong composition. Order and disorder captivate the eye. Strong color contrast is pleasing.
Order:
A collection of circles — circular orange bugs with their own circle patterns, framed by a circular rock.
Disorder:
The bugs are scattered in a disorderly way; what’s more, the pattern is disrupted by a green ladybug.
These are compositional elements I find myself drawn to in the field.
“Alternative & Creative Lighting” Photo Workshop by friend of DPA, Rick Friedman
A M.A.R.S. School workshop from May 3-8 in Dewey Beach, Delaware

ABOUT THE INSTRUCTOR
Rick is a Tamron Pro and a Profoto Ambassador, and has been a photojournalist, portrait and travel photographer for over 4 decades. Based in Boston, he travels the world for numerous publications, corporations, advertising assignments and film and television productions. His published work has appeared in Time, National Geographic, Newsweek, New York Times, Washington Post, Boston Globe, Nature, USA Today, The Guardian, Der Spiegel, Stern, Discover, and on ABC, CBS, CNN NBC, Discovery Channel, Saturday Night Live, The Late Show and many other publications and productions around the globe.
He has produced over 75 book and magazine covers and has worked on 20 film productions. Rick, known for his practical, creative lighting, has been teaching “Location Lighting” for the past 20 years. He has taught workshops at PhotoPlus, WPPI, Imaging USA, SWPP(London), Xposure (UAE), PPoC (Canada), White House News Photographers Association, CanAm Photo Expo, numerous PPA events, and many other workshops.

ABOUT THE CLASS
Do you want to create and light portraits that tell the story and capture the moment in any location or lighting situation? And do you want to learn how to do that with portability and speed? Then join the legendary Rick Friedman in this hands-on class, where you’ll learn about gear, lighting, and the importance of researching, posing, and interacting with your subject for the best outcome.
You’ll learn to work with speed lights, both on and off-camera. How to mix them with available light. How to mix speed lights with large and small portable strobes. You’ll learn radio and trigger control techniques to fire the strobes and light meters. You’ll learn to work with soft boxes, octaboxes, diffusers, reflectors, Cinefoil, grids, snoots and other ways to control the spill of light. And you’ll learn different light painting tools and techniques, and how to ‘light paint’ models, both indoors and out. They’ll be lots of strobes, light modifiers, gels and light painting tools for everyone to use. Rick is an open book, and will help anyone with any questions about their equipment or any aspect of photography.

You’ll learn how to –
- Capture the moment with perfect light
- Work quickly to create that perfect light
- Mix strobes and available light
- Create unique looks while controlling your lights, adding color gels and smoke.
- Project unique backgrounds
- Light paint models
LEARN MORE ABOUT RICK’S WORKSHOP AND REGISTER HERE!
March FinerWorks Award Winners

Every month, our judges select 2 of our social media members to receive an HD Metal print of one of their photos, printed by our sponsor Finerworks.
We choose one winner from each of our Facebook groups:
“Celebrating Senior Shutterbugs” and “Digital Photo Academy Community”
| Posted on our “Digital Photo Academy Community” Facebook group by Debbie Rigden: |

| Posted on our “Celebrating Senior Shutterbugs” Facebook group by Cherie Burton Chepaitis: |

Monthly Small-Group Photo Workshops in 24 Cities
Plus Private Classes on Your Schedule
Since 2006, Digital Photo Academy has offered hands-on photography workshops in 24 cities across North America.
Access the live cities page on our website to explore upcoming photo workshops in your area. Elevate your photography skills with help from our experienced instructors in interactive sessions!

Our Social Media
Share your own original images in our Facebook groups, and you’ll be automatically entered into our monthly FinerWorks prize contest.
Each month, our judges pick two winners, and FinerWorks prints their photo on a beautiful HD Metal print that can hang on the wall.
Join our Facebook photo groups here:
• Celebrating Senior Shutterbugs
• Digital Photo Academy Community

And don’t forget to check out our main social pages for stunning photography.
Main Pages:

Copyright (C) 2024 Digital Photo Academy. All rights reserved.
