DPA Magazine
Dramatic Angles
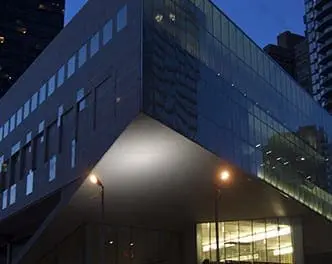
© Adam Stoltman Look for Dramatic Angles to add Impact. Just like people, buildings have good sides and bad sides. By walking around a building you can find which lines are flattering, and which are not. You can also position yourself to create the most dramatic composition possible. In the image here of the new Alice Tully Recital Hall at New York′s Lincoln Center, the powerful and angular lines of the architecture are accentuated by the low vantage point and by the photographer choosing his position carefully.
The Right Light
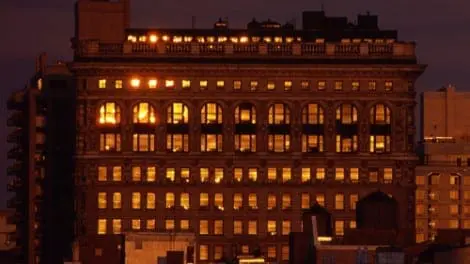
© Adam Stoltman By waiting for late afternoon light, what would by itself otherwise be a flat and uninteresting composition becomes fiery and intense. The reflected sunlight also shows off the architectural style and detailing evident in the upper windows and floors of New York′s famous Flatiron building. Wait for the right lighting conditions to give your architectural images more substance and depth.
Be Patient
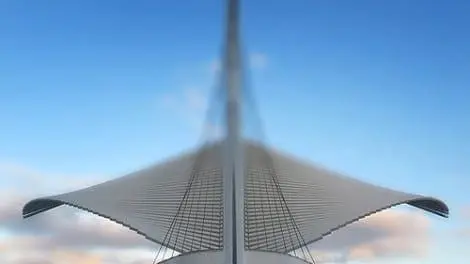
© Peter Bosy These images were taken with a basic point and shoot digital camera. The camera′s mode was set to Av, and the exploration of the exterior and interior began one shot at a time. © Peter Bosy The best advise I can give anyone interested in architectural photography is to be patient, and be ready when the light is just right. Plan ahead if possible. While I arrived at this museum it was overcast and cloudy. Fortunately as the sun was to set, the clouds parted and the sun washed the building with beautiful light. This building is a rarity in that it can be photographed during high noon as well as near dusk to create amazing images.
Shutter Speed, Blur, Camera Shake, Subject Motion and Depth of Field. Learn to Recognize and Distinguish the difference.
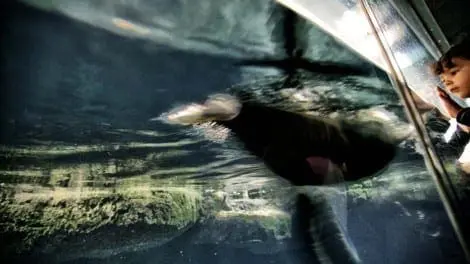
Shutter Speed, Blur, Camera Shake, Subject Motion and Depth of Field. Learn to Recognize and Distinguish the difference. text by John Bentham The desired look of the photo: There are many times when a photographer will opt to include some blur, and/or camera shake in a photo for aesthetic reasons. Some of the photographs in the animals webinar are shot with fast shutter speed using a tripod, others are shot with slow shutter speed without a tripod. Sometimes a photographer may choose to deliberately incorporate motion blur, mixing on-camera flash, with the ambient light, and using a slow shutter speed without a tripod. Learning to hold a camera steady at 1/4 second exposure takes a bit of practice but is a very useful skill. The subject of the photo: If a photographer is shooting any type of documentary photography, or news assignment it is very likely they are not using a tripod. This type of subject moves too quickly to use a tripod. Unless you have a relatively cooperative subject, willing to hold still long enough for you to position a tripod, you can’t follow a moving subject with a tripod. Sports photographers often use monopods, and sometimes use tripods, due to the weight of the very long lenses they use. You can’t hand-hold a 300mm lens very long and you could not hand-hold a 500mm lens successfully at all. If you are shooting in a crowded situation, or a situation where you have to move fast, from location to location, once again a tripod is a hindrance. Where a tripod really becomes essential is in landscape photography or in Macro photography. The trick to shooting good landscape photography is to keep everything in the photo sharp and in focus. To achieve this you usually need a very small aperture such as f22. To shoot with a very small aperture you must often use a relatively slow shutter speed, thus must use a tripod. Alternatively when shooting Macro photography or any type of close–up photography requiring precise focus, a tripod is very helpful. Image © John Bentham NY DPA Photographer The shutter speed: The safe hand-hold shutter speed, the slowest shutter speed you can hand-hold a camera steady without the photograph showing visible signs of camera shake, is 1/30th of second. This is an accepted standard. With practice in certain circumstances, using certain lenses, it is certainly possible to use a slower shutter speed and still avoid camera shake. Thus, using a tripod to shoot a photo is partly determined by the shutter speed and secondarily by the focal length and lens. If you are trying to shoot at a shutter speed slower than 1/30th you will probably see some camera shake unless you support the camera, either with a tripod or by setting the camera on a fence, or park bench etc. This becomes much more of an issue when using a long lens. If you shoot using a 18mm lens you will have fewer issues with camera shake than when using a 300mm lens. Remember, a tripod will not remove the blur caused by the subject you are photographing. That is determined by shutter speed. Even when you shoot at a relatively fast shutter speed (1/125th second), your subject will still appear blurry if they are moving quickly enough. A tripod only removes blur from the camera side of the photo. The photo above by John Bentham, DPA instructor in New York is shot without a tripod in low light at a relatively slow shutter speed. The 1/8 second shutter speed is fast enough to freeze the motionless boy in the photo but slow enough to reduce the penguin swimming past to a blur. This adds to the expression of wonder in the boys face, just what am I looking at? John has incorporated a little help from NIK Viveza Software to bring out the details in the water and add some definition to what may have appeared as murky rocks in the background. Depth of Field: This refers to the depth from the camera position into a photograph that is in focus. IE: 10 feet from the camera or 20 feet from the camera, or 1 mile from the camera. How much of that distance that appears in focus is the depth of field. Depth of field is determined by the aperture, focal length and camera to subject distance. If you are 2 feet away from a portrait subject your background will be more out of focus (shallow depth of field) than if you are 25 feet away from a portrait subject. The smaller the aperture, say f22 VS a wide aperture of f2.8, will give you more (wider) depth of field. Image © Frank Siteman Boston DPA Photographer Viveza Nik Software: The photograph of an iguana by Frank Siteman, a DPA photographer in Boston is a classic shallow depth of field shot. By shooting with a longer than normal focal length (135mm), and being relatively close to his subject, combined with a wide aperture Frank has separated the iguana from the background with making it appear larger, more striking and more significant, both literally and figuratively. Frank has further enhanced the iguana photo adding a little Viveza NIK Software which makes the colors jump and the contrast more defined. Used subtly or with more extreme adjustments Viveza can make a photo appear brighter, more complex and with more punch, or you can push it all the way to an extreme technique so it appears as a vivid painting, the control and effect are yours to explore.
Techniques on making your image pop: When to Use Your Tripod and NIK SilverEfex Pro
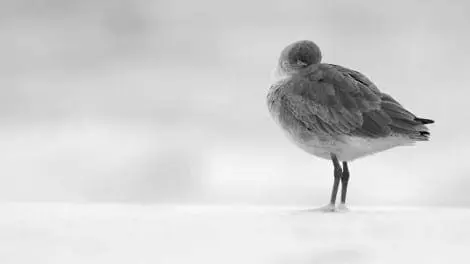
Techniques on Making Your Image Pop: When to Use Your Tripod and NIK SilverEfex Pro A DPA webinar attendee asked: Are most of the animal photos shot with a tripod? Answer: I myself rarely use a tripod when I’m shooting documentary photos as it would be cumbersome and a tripod doesn’t fit the feel of documentary work or the active pace required to capture the subject. I use tripods often for my portrait shoots and many photographers use tripods all the time, depending on the type of photography and the subjects they shoot. The decision to use a tripod will affect many aspects of the finished photograph or shoot. It is important to understand and recognize the difference between Blur, which is caused by subject movement during exposure, Camera Shake, which is caused by camera movement during the exposure and Shallow Depth of Field, which can cause the subject to appear or actually be, Out of Focus. They are very different issues and caused by different things. All of these can be controlled and more importantly prevented in different ways. © Nikhil Bahl Make it Pop with SilverEfex Pro The striking Black and White photo above shot by Washington D.C. instructor, Nikhil Bahl was shot with the 35mm equivalent of a 510mm lens, a very long focal length. Usually when using long focal lengths and lenses of this size it is advisable to use a tripod. With extremely long lenses any camera movement is exemplified and exaggerated, a slight camera shake can make an otherwise sharp image look soft. This image is very sharp and you can read very sharp detail in the plumage of the bird, making a simple shot appear rather poignant and complex. If you want to really bring out the detail in your Black and White Images take a look at the B&W Software NIK Silver Efex Pro. It’s great for adding simulated film grain, sharpness and the look and feel of old school highly detailed darkroom photos. Sort of like shooting with a 4x5 View Camera and painstakingly printing exhibition prints without all the fuss and bother, count me in! Using a tripod is a personal decision as much as a technical one. It depends on your individual style of shooting, and the subjects you are passionate about shooting. There are also logistical issues, if you don’t want to be encumbered by a tripod you may be forced to shoot at a higher shutter speed, and thus forced to shoot at a higher ISO depending on the available light. These type of decisions are partially what form a photographer as an individual artist. There is really no right, or wrong way, to photograph anything, the correct way to shoot anything is that which achieves the result you as the photographer desire. If you want to create photographs that look like Impressionist paintings you utilize a slow shutter speed to contribute a certain level of camera shake providing an overall softness, combined with a high ISO to achieve a pointillist effect. These choices are what make your work personal. There are times when a tripod is essential to capture the shot. The the trick is to have it with you, which comes from experience and commitment. Tripod Tips: When using a tripod, Never lift the tripod by lifting the camera body, make sure the camera is firmly attached and then lift by the Tripod. Don’t add the weight of the tripod to the camera body. You can strip the tripod socket or worse. I know a guy who ripped the guts out a camera body doing this; the insides were left on the tripod while he was left holding a body shell. Use caution also when using tripods indoors, be careful when you lift up the tripod with a camera attached (to raise or lower the tripod legs). Be careful not to bash the camera into the ceiling, lights, ceiling fan etc. Also when you set the height of a tripod make sure all the legs are level (and set at the same the same leg extensions). It’s really annoying to work with an uneven tripod. I have etched pre-measured lines into all three legs of my tripods which aids in leveling. You can use other camera supports such as Tree pods (Clamps etc that attach to a tree limb, Gorilla Pods that attach to just about anything or bean bag type camera rests that you lay on a rock, window ledge or other stable platform. NOTE: Also see the Webinar Tip: Shutter Speed, Blur, Camera Shake, Subject Motion and Depth of Field for additional information about tripods and shutter speed.
Fix it with NIK
Fix it With NIK Software The beautiful, whimsical photo of Love Birds above shot by Seattle DPA instructor Wolfgang Kaehler is a great example of a photo shot without a tripod. Wolfgang was able to achieve selective focus and sharpness even though the scene is not brilliantly lit. He used used a relatively wide aperture enabling him to shoot at a faster shutter speed. It helped too that the birds were a static subject, with birds in flight Wolfgang may have had some issues with blur to contend with. However if you weren′t able to get it right on the first try like the image by Wolfgang, NIK has created a software that will be able to assist you get the sharpness you′re looking for. Image © DPA Instructor Wolfgang Kaehler Ever capture a great shot like this image by Wolfgang, but instead it isn’t quite as sharp as you had hoped? It’s a spectacular photo, great imagery that captures a unique moment but is not quite tack sharp focus and with the edge you wished for. Maybe you forgot your tripod, or intentionally left it at home to travel light. The sun was fading and you were forced to use a slower shutter speed than desired, we’ve all done it out of desperation. Or more likely you were forced to use a very high ISO setting to avoid that slow shutter speed and picked up some excessive digital noise from the long shutter speed. NIK Software has software to address these issues. One of the great tools in Viveza2 software is a slider control to adjust Structure on the Viveza panel or using the signature control points in NIK. Either with a split screen or side-by-side screen you can see before and after effects adding a bit of structure can make. Take a shot that’s a little fuzzy and transform it into something quite sharp, adding a necessary bite to the shot. If you picked up too much digital noise you can repair this using DFINE, the NIK Noise reduction software.
On Camera Flash Modifiers
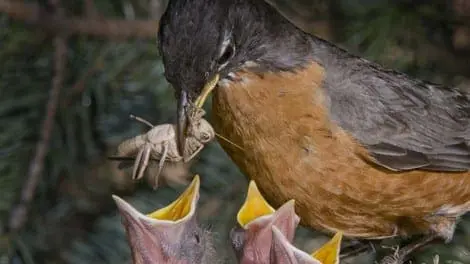
Using Flash in the field and On Camera Flash Modifiers text by John Bentham When shooting animals or other subjects outdoors in bright sun your initial assessment would be - It’s bright outside, I don’t need a flash? However shooting outside with flash is helpful for certain subjects and necessary more often than you think. There are times when areas of the scene are just too bright in comparison to others. A flash can help to bridge narrow the gap between the two exposures giving you a better more even exposure. At other times you need the flash to lighten up an area in shadow. Or to freeze the action a little and draw attention to parts of the scene. Image © Denver DPA Instructor Russ Burden This stunning photo of a mother bird feeding her young, shot by Denver DPA instructor Russ Burden is a perfect example of a situation where flash serves to bring out the details in a photo, freezing the action, effectively stopping the motion of the chicks in time. A touching scene, a snapshot of nature hard one by Russ with some preparation, the right equipment for the situation and a little luck. If you are considering an external On-Camera flash you should buy a unit specifically dedicated to your camera. The advantage here is the camera, lens and flash will all communicate to each other and provide feedback to produce a better exposure. If you are then considering expanding your kit with a Flash Modifier basically there are a few elements to consider, size, cost and durability. In any situation the larger the light source the softer and more pleasing the light, thus a small 6x10 inch soft box mounted on your flash will give you a softer look than a bare head which measures 2x3 inches. However a small box is still pretty large when you’re working in a very crowded setting or if your trying to traverse though some bush to get to that eagles nest. If you’ve got people behind you also trying to see or photograph the eagle they will be annoyed its in their way, or in their shot etc. Image © NY DPA Instructor Tiago Nunes The Micro Apollo looks fine and is not too expensive, but it could get crushed in some situations. I use the small slip on plastic Stofen diffusers because they are small, durable and cheap ($20). The softness comes from how you use them, how you position them. By swiveling the light and pointing it into a 10x10 foot wall, the wall becomes your light source not the small flash. Obviously if you’re shooting wildlife there are no walls to take advantage of, however you can sometimes take advantage of walls at zoos. In situations where the animals are at any distance, further than 25 feet, you probably should remove the modifier and just shoot bare head. You generally need the power and throw of the flash zoom head system (the flash tube inside the flash unit will actually zoom back and forth when you zoom the focal length on the lens. With the modifier off the flash will narrow it’s beam at long focal lengths to produce a longer throw. I have also heard good things about heard Gary Fong modifiers, although they are kind of expensive for just a piece of plastic.
The X-Factor and How it Affects Photographing Animals
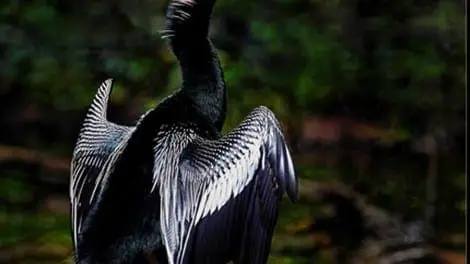
Digital Sensor Sizes, The X-Factor and How it Affects Photographing Animals Text by John Bentham The most important thing is to determine what size digital sensor your camera body has. Panasonic cameras have the 4/3 digital sensor (17.3 x 13mm) which is smaller than other manufacturers. Panasonic Micro 4/3 and Standard 4/3 System cameras have an “X” factor of 2. The small APS sensors of Canon cameras have an X factor of 1.6 with any lens you mount, Nikon cameras have an X factor of 1.5. To work out the X-Factor you simply multiply the focal length of your lens by the X factor for your camera. The X-Factor alters and extends the zoom range of the lens. With any lens you need to apply the X factor to get the true focal length. IE: If you mount a 45mm lens on a Panasonic camera (X Factor of 2), you are actually shooting with an 90mm lens (45mm x 2 = 90mm). When using a 14 - 140mm lens, on a 2X body this equates to a working zoom range of 28 - 280mm. If you want to end up with a 400mm lens you only need to buy a 200mm lens. This often translates to a significant reduction in weight, size and cost. Image © Christine Reynolds Tampa DPA Instructor The photo above by Christine Reynolds is a long telephoto lens shot of a Anhinga shot on the St Johns River in FL. These are sometimes called Piano Birds for the markings on the wings, or Snake Birds because they swim with their body below the surface leaving only their head and neck visible, or Water Turkeys because of their tail markings. Christine used a 500mm lens with 1.4x extender (tele-converter) making her focal length the equivalent of a 700 mm. Often in the wild, many animals and birds are so wary you can’t get close enough to photograph them without using a very long telephoto lens. In post production Christine used a couple of the great NIK Software programs. NIK Viveza was used to bring out details, which served to accentuate the marking on the birds wings. In addition Christine utilized the Tonal Contrast effect in NIK Color Efex Pro. This really made the Anhinga against the dark background and made the photo easier to read. Choosing the right focal length for a shoot is determined by a number of factors many of which are dictated by the subject itself. There are also a few equipment restrictions and technical difficulties to deal with. Unfortunately not one lens does everything and you tend to get what you pay for. Good lenses are expensive but if you pay a premium for good “glass” the return is sharper pictures, less distortion, brighter colors, less flare and refraction ... all good things. Remember too with any choice of lens you’ll need to add approx $50 -100 for a protective UV filter and if you shoot outdoors in daylight, a Polarizing filter. If you buy a very fast lens you often lose some focal range (zoom length). Ideally you need to buy two fast lenses, a wide zoom and a long zoom. Look for features like fast aperture, full time f2.8 or f4 and OIS (Optical Image Stabilization) etc. When choosing a long lens for shooting animals and nature, either in the wild, compounds or zoos the most important feature is long focal length. This is one of the advantages of the 4/3 camera system with a smaller digital sensor which extends the zoom range once you apply the X-Factor.
Photographing Animals with a Telephoto Lens
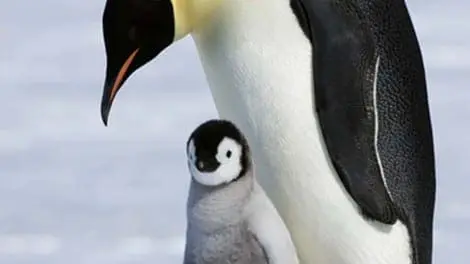
Choosing a Lens and Digital Sensor Size: When purchasing a lens you first determine what size sensor your camera body has. Panasonic cameras have the 4/3 digital sensor (17.3 x 13mm) which is smaller than other manufacturers. Panasonic Micro 4/3 and Standard 4/3 System cameras have an “X” factor of 2. When choosing a long lens for shooting animals and nature, either in the wild, compounds or zoos the most important feature is long focal length. This is one of the advantages of the 4/3 camera system with a smaller digital sensor which extends the zoom range once you apply the X-Factor (see below). If you want to end up with a 400mm lens you only need to buy a 200mm lens which translates to a significant reduction in cost, weight and size. Good lenses are expensive but if you pay a premium for good “glass” the return is sharper pictures, less distortion, brighter colors, less flare and refraction ... all good things. If you buy a very fast lens you often lose some focal range (zoom length). Ideally you need to buy two fast lenses. One wide and one long. Look for features like fast aperture, fixed full time f2.8 or f4 and OIS (Optical Image Stabilization) etc. Image © DPA Seattle Instructor Wolfgang Kaehler Long Telephoto Lenses: For wildlife it’s best to shoot at a shutter speed of at least 1/60th, higher is even better but certainly no slower than a 30th of second. At a 1/30th there is little risk of camera shake if the camera is supported but the subject movement can still be quite blurry, even if the subject is static which is rare and fleeting with shooting birds or animals. You are better shooting at 1/60th second and bumping up the ISO a stop if you need more speed. With newer cameras the digital noise issues of older cameras are not as much of a problem thus 800 ISO still looks very good. You are trying to get the correct exposure on the face of the animal or bird. Nothing else matters in this context. If you are shooting a group instead of a single animal you will often find very different exposures on the individual members of the pack. Adjust your exposure for close-ups of individual animals and for group shots get the best overall exposure making sure there is correct exposure on the more prominent animals in the scene. The penguin photo above, shot by Seattle DPA instructor Wolfgang Kaehler was captured on one of Wolfgang’s multiple Antarctica trips. Being a very experienced nature, wildlife and location photographer Wolfgang knows he needs to carry long telephoto lenses to capture certain photos. For this photo he has used a 380mm lens, long enough to get in close but not so long he needs an extra sled and dogs to carry it. Very large lenses such as a 600mm can weigh in at 10 lbs (lens only), coupled with large professional camera you’re up into 15 – 20 lbs. That’s a lot of weight to carry into areas where you need to be flown in and there are often weight restrictions on what you’re allowed. Sometimes with equipment it’s a tradeoff between practicality, necessity and desire.

