DPA Magazine
Just Peachy
© Rick Wright Sometimes you sit down for eggs at the local diner and you come up peaches. While waiting for my breakfast plate (eggs-over-easy with grits), the chef de cuisine was cutting up and sharing fresh Jersey peaches with the counter diners. Lucky me, I happened to have my camera nearby (ALWAYS carry yours). The light was very low and I wanted to use ISO 100 for its smooth tones. So, I had to choose a wide open aperture (ƒ2.8) and pray. Happily, the extremely shallow depth-of-field put the emphasis on those glowing yellow peaches and proved a nice contrast with the stainless steel background. By chance, the chef-in-question passed through my frame and provided that extra bit of motion and interest inside the frame. It pays to consider all moments of your day as possibilities for photographic chances. Peachy.
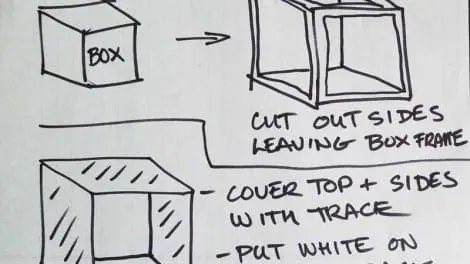
How to Create a Stellar Still Life Lighting Setup for Cheap!
1) Get a box approx twice the size of the largest piece you want to photograph. 2) Cut out front, side walls and top of the box, (leave the back and bottom intact) leaving a shell structure. 3) Cover the top and sides with trace paper, or translucent photo diffusion. It doesent have to be one large sheet, you can scotch tape pieces together. 4) Cover the bottom and back in white paper that swoops at the back edge so you wont get a shadow or see a hard line in the photos. Place box in bright direct midday sun and spin it so the the light comes in from the top and sides, with no direct light coming in the front. 5) Point the camera in from the front. Set the camera on a tripod, to make sure photos are sharp. 6) Set camera on Aperture priority. 7) Shoot at f16 to get everything in focus. ~ Or for the shallow depth of field effect shoot at f2.8 or f4.
On the Spot in Restaurants
© Chuck Place Food. Everyone loves it. Photographing food in restaurants is not all that difficult, but you have to be quick. Find a table near a window, backlight your food and bounce a little light back into it with a collapsable reflector, or even a menu, and expose for the near side. That′s it. If it′s ice cream, however, be ready to shoot fast. Within a couple minutes your dessert will look like Frosty the Snow Man in June. Just a big colorful puddle. Make sure you let the restaurant know what you are doing and don′t take too long. The meal is, after all, more important than the photos.
Think Outside the Box
© John Bentham This photo was intentionally overexposed to give the fish tank a surreal otherworldly look. A very easy technique where you simply increase your exposure to add one or two stops (f-stops, exposure values). You can achieve this by using the +/- exposure compensation feature on your camera. You can also cover your bases by using the auto bracket feature which will shoot multiple frames at different exposures.
The Motion of Water
© John Betham Capture the motion of water, ripples and waves are great subjects. By utilizing the correct shutter speed for the movement of the subject (woman), and the background (water), I was able to find the best combination of blur and sharpness to create this image. There is movement in the water rushing off her body and in the swirling of the waters surface and yet there is still sharpness on her face where I wanted it to make her features legible in the photograph. This is often achieved through trial and error and a few test frames.
The Importance of Time of Day
© John Bentham Shooting in early morning, or late afternoon as in this photograph, are the best times to photograph water. When the light is coming from the side, water becomes a unique subject, reflections become more pronounced, the contrast of features, ripples and plants floating in the water becomes more intense, and the photo takes on a glow. The color temperature (the effective color recorded in a photograph) changes drastically at this time of day. You often get more interesting, vibrant results by not adjusting (correcting) your color balance when shooting sunset photos. Just let the color get soaked up by the water, the photograph will appear bright and spectacular.
Simplify the Elements
© John Bentham Often a simple photograph is more interesting than a busy one. By minimizing and reducing a photograph down to its basic elements you are refining the message. By selective cropping I have refined this photo to 4 things, woman, dock, water and reflection (trees). On backlit shots like this its important to get the exposure right, this sometimes takes a little experimentation.
Power up with a Polarizing Filter
© John Bentham When shooting outside in daylight a Polarizing filter is very helpful. This is especially so whenever shooting in and around bodies of water. A polarizing filter reduces or eliminates reflections on the surface of the water allowing you to see into the water itself, adding depth and rich deep colors. The contrasting elements of this photo, the bright aqua water and the dark skinned girl are what make this a striking image. These same elements make this a tricky shot.The exposure meter in your camera will be fooled by the contrast and bright areas. To get the correct exposure you should take a test shot or two and adjust your exposure using the +/- compensation feature to get the balance right between the water and the swimmer.
Keep Your Horizon Straight
© John Bentham Part of the success of this photo was being in the right place at the correct time. When shooting landscapes and seascapes there is often a optimal time of day to photograph any scene. Unfortunately it is difficult to find that time of day, and depending on the weather. and season that optimal time changes daily. I was riding on a ferry just as we passed this lighthouse, I had my camera in my hand ran out on deck and shot 3 frames then we cruised past. The sky cooperated by giving me a few steaks of cloud to break up an otherwise gray plain sky. One frame was good, but that’s all you need. When shooting seascapes keep your horizon straight, this gives viewers a visual reference point and adds a layer of depth to your photo. The general rule with horizons is they should be straight or tilted at a somewhat extreme angle otherwise it looks like a mistake.
Intentionally Underexpose
© John Bentham By intentionally underexposing this photograph I have let the water go very dark, even black in some places. This can be very compelling and mysterious in a photo, especially in dramatic B&W shots. Water as a subject is so beautiful and interesting you often don’t need much else in the frame to make a nice photo. Just the water and a few other elements, in this case the lilies stretching out towards the camera are enough.


