DPA Magazine
Scale is Everything
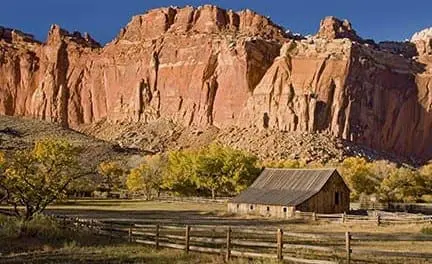
© Allen Birnbach One of the most challenging parts of shooting on location is giving a sense of what you were feeling when you first got the idea to shoot a particular scene. For me, scale relationship is a key ingredient in that. In composing the image, I think about the elements that made me stop the car. Here, it was the aged barn, lost in the vastness of the American West. So rather than zoom in on the building, remarkable as it was, I made it relatively small in the frame relative to what was around it. That scale relationship in respect to the mountains and sky to give a sense of place I wanted to convey. When shooting scenics, keep this idea of scale, along with rule of thirds, and keep it simple in mind.
Rustic and Rusty
© Rick Wright Yes, I admit it, I am a sucker for these rustic country-road scenes with rusty trucks. Photography almost seems tailor made for such moments, doesn′t it? On the day I spotted this old International Harvester dump truck (note the logo at top center), it was overcast with diffuse light. Diffuse light in this scene is a real gift as the bright "IH" logo, wheel rims, and glass headlamps don′t get blown out by contrasty sunlight. I left my ISO at 100 and shot at ƒ4.0 for a little depth of field to capture both the tires and truck grill. At ISO 100 I would get all the detail possible and could keep the rubbery looking texture of the tires. The downside? I was hand-holding the shot at 1/20th second. To help out there, go ahead and flip on your self-timer and let the camera itself release the shutter for you. Less vibration! Calm your nerves, breathe out, click! Oh, and about that composition...well, I seized on the idea of getting in really tight and making a play of all those circles and their relationships: orange hazards, white headlamps, black tires, metal rims.
The subject as Abstract
© Hinda Schuman Is this a cow? What about Magritte’s painting entitled “This is not a pipe” True it is not a pipe, it is a painting of a pipe. In fact this is not a cow at all. It is a fiberglass impression of a cow, and more to the point, it is a photograph of part of a fiberglass cow. So what does this have to do with cows, portraits of cows, national cow day or anything else dairy related. This photography tip is actually about less is more. A viewer can look at this image and figure out that it is part of a cow. © Hinda Schuman The second image tells even more information without giving the whole cow away. Allowing the viewer to come to their own conclusions, not giving away all possible information, is part of the joy of creating a photograph. How little information can you give and still tell a story, or still create a sense of light, or emotion, or composition? A great assignment to complete is to photograph a subject, and reduce it to the smallest amount of information and still make a point. I offer cow1 and cow 2 as examples. Which is more fun to look at? The second cow photograph is the kind to run in every small town paper. The local celebrity tries to milk a cow. Everyone thinks this funny because so few cows are milked by hand any more, and so few people know which end of cow milk comes from. It is alive with goofiness, and fun for a minute. But does it warrant a second look?
How to Take a Picture of Cows Without Being Stampeeded
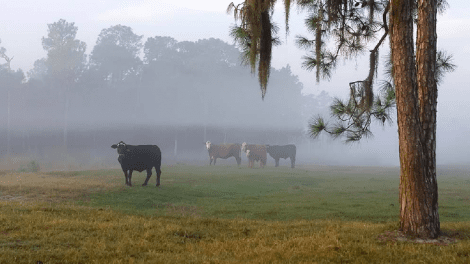
© Milton Heiberg 1. Get up early in the morning and stop off at McDonald’s for a fast-food breakfast. I like a Bacon & Egg Bagel. Also pick up a “Salad Plate” for the cow. (Not a Big Mac—cows are very sensitive about that.) © Milton Heiberg 2. Arrive at the cow pasture before dawn. Cows and many other subjects look their best with a subdued foggy background. The early morning light is always the best—with or without fog. 3. Get at least one cow in the herd to look at you. This is easy—cows always look at the silly person with a box in front of one eye. Put the selected cow into the “rule of thirds” (or not) looking into the frame (or at you). Remember the first rule of composition—“There are no rules.” Photography is an art. But know the rules anyway, and when to break them. © Milton Heiberg 4. Be at the same eye level with your subject (animal or person, child or adult, standing or sitting). However, when cows are being herded, it is best to have some elevation to get a sense of the size of the herd, and crowding that takes place. In the example below I opted for the bed of a small truck. It also prevented being stampeded. 5. When photographing cows, or any subjects in a group, focus on the closest one (assuming that it is one facing you) and stop down to a small aperture for good depth of field—f/11 or smaller. You will most likely need to increase your ISO setting to at least 400 depending on the light and motion of the moving herd. © Milton Heiberg 6. Spend time to get to know the cows. Follow the first rule of photography from Milton’s Top Ten List—“Love your subject more that your camera.” 7. By now it’s lunch time. Eat the salad plate if a cow hasn’t stolen it. 8. Go home, pick out your best shot, and run it by your spouse, a friend, or your DPA instructor by email, and remember post it to the July Assignment: THE COUNTRYSIDE! Legal notice: The author cannot be held responsible for any unfortunate hoof prints on body parts, camera damage, resulting divorces, broken bones, paternal lawsuits, flea infestations, milk stains, or other cow-camera injuries while in Mexico City,Barcelona, New York City, or any other rodeo arenas, or wherever there are cows present.
Vantage Point
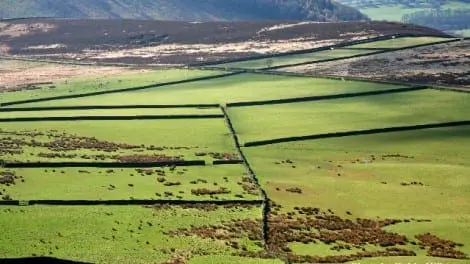
© Robin Hill Try shooting landscapes from a high vantage point and with a longer lens than usual. This helps to define geometries within the photo by "squeezing" the perspective somewhat.
Architecture & the Sweet Light
© Russ Burden While most subjects look better when shot in the sweet light of sunrise or sunset, some benefit more than others - think architecture. Whether it’s a high rise skyscraper, a country barn, or even your own home, photographing them in golden light makes them appear more striking and dimensional. So set your alarm clock early enough to be where you want just as the early light kisses it. Or reconcile that you’ll be a bit late for dinner when you photograph the structure of your choice as the sun descends close to the horizon. Mid Day Blues: Shooting architecture in mid day light has drawbacks. The color of the light is very blue. This creates a very cool tone that lacks impact. In the warm light of sunrise and sunset a much more golden tone is imparted producing a soothing effect. Additionally, mid day light illuminates the building from the top. This results in contrasty and harsh light which tends to blow out bright areas of the building and blocks up the dark areas revealing little or no shadow detail. When the sun is low, texture is revealed producing a more three dimensional look to the subject. This is caused by the sidelight that rakes across the raised portions of the structure. Stonework and intricate details are revealed with more depth. Expose for the highlights to make sure you don’t lose detail in them. Better yet, shoot with the intent of processing the image using HDR to reveal more detail in the shadows while maintaining the highlights. For a bit of added drama to the background, listen to the weather and plan the shoot for a day that calls for partial clouds in the AM or PM. Golden yellow clouds with vibrant reds and oranges will dramatically offset the building against the sky. Blue sky days also work well if you prefer a neutral backdrop. Try to choose buildings that don’t have clutter to the left, right, or behind them. A distracting background will confuse the viewer as to where he or she should rest their eyes. The simpler the composition, the easier it is to communicate the intent of the photo. Watch how the shadows and highlights play upon the building. Some result in a better image shot at sunrise while others are better at sunset. So pick a building and go out and capture it in early and late light to create a magnificent architectural photo.
Freezing the Moment II
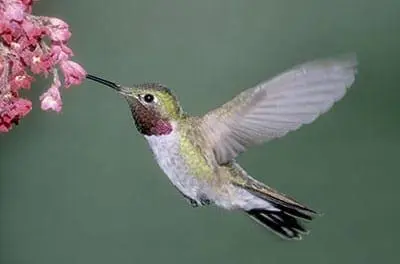
Lots to think about: freeze the motion / emphasize the action / make it artistic / zoom it / pan it / time it right / know the subject / ........... I wanted to write a single HOW TO article on action but based on the number of topics and wanting to write more than one sentence about each, I decided to dedicate this entire month’s Tips to Action. Action and digital photography go hand in hand. Digital photography can expedite the learning process and provide better images using the instant feedback of the LCD. If the results are not what you desire, modify the settings to produce the wanted effect. Bump up the shutter speed, slow it down, adjust the ISO for more versatility, change your angle, etc. Make sure to check all the articles this month to get tips and hints on how to capture the many different ways to photograph action. When it comes to stopping action, think images from newspapers, news magazines, Sports Illustrated, natural history publications, etc. The key moment is frozen in time and every facet of the movement is stopped. Whether it’s the point of impact of a key tackle in a football game, a split second emotional expression as the rescue team pulls a loved one to safety, or two eagles colliding in a mid air duel over a fish, the resulting image leaves the viewer saying WOW! Completely stopping the action is dependent upon the shutter speed at which the photo is made. It’s not an “almost stop” where part of the subject depicts movement. This often implies the photographer didn’t accomplish the goal. The shutter speed needs to be fast enough to arrest all movement. There are a number of factors that determine at what speed a photographer can shoot. Knowing how these factors play into the mix is huge in order to create the perfect action stopping shot. Based on the limitations of each given situation, it may or may not be possible to produce the necessary result. © Russ Burden Ambient Light: Bright and sunny conditions offer the potential to use very fast shutter speeds. Bright overcast conditions provide less light, therefore less versatility. As clouds thicken, your options decrease further. Indoor lighting and or artificial street or stadium lighting imposes further limitations. SOLUTION: As light levels decrease, open your lens to wider f stops / use lenses with wider maximum apertures / bump up the ISO. Fast Glass: Most professional sports, newspaper and nature photographers have lenses with fast glass. These lenses allow the photographer to set apertures of f4 or f2.8. With each additional gained f stop comes one additional shutter speed. If photographer A uses an f5.6 lens while photographer B uses an f2.8 lens, this means while photographer A’s fastest shutter speed may be 1/125, photographer B can use 1/500th. This difference is huge when it’s necessary to freeze the moment. SOLUTION: buy fast glass but it’s expen$ive / bump up the ISO / wait for the ambient light to brighten. © Russ Burden Stalling Point: If you’ve increased your ISO to the point where you know the image quality will suffer and your lens is open to it’s widest aperture, rather than throwing in the towel, shoot often and a lot. The reason I suggest this is two fold. In that you’re shooting digitally, simply edit out the blurry shots. If none work, chalk it up to practice and experience. The second reason is more key. A lot of action has a stalling point. If the shutter is open at this point, the necessary speed to record it doesn’t have to be as fast as when it’s moving more quickly. SOLUTION: shoot more photos and set the motor drive to continuous high to increase your odds of capturing the stalling point. The Plane: The ambient light is low, you have a lens with fast glass, your ISO is set high, you’ve tried the stalling point theory, and still the pics don’t reveal frozen moments. There’s still one more option you have but it’s contingent upon the direction in which the subjects move. Subjects that move across the film plane require faster shutter speeds to arrest the motion than those coming toward or moving away from you. Try to limit your photography to the moments at which this occurs. SOLUTION: While it’s not the ultimate in providing versatility, it offers an option and hopefully a winner. Flash: Flash is a great tool to help freeze the moment if the subject is close. The effective shutter speed is actually the duration of the flash as opposed to the shutter speed set on the camera. For example, in the accompanying image of the hummingbird, I dialed down the power setting on my flash giving me an effective duration of approximately 1/8000 of a second. As I was using flash as my main light, even though my camera was set to 1/250, it was the quick duration of the flash that froze the hummingbird’s wings. © Russ Burden To learn more about this topic, join me on one of my Photographic Nature Tours. Visit russburdenphotography.com and click on the NATURE TOURS button for more information. Also, pick up a copy of my new book, Amphoto’s Complete Book of Photography. You can purchase a signed copy directly from me or visit your local book store or Amazon. Contact me at [email protected] to order your signed copy.
Family Portrait in the Studio
© Michael Thoennes When photographing a family it is very important to be quick and ready especially when young children are involved because of their limited attention span. Be prepared the moment they arrive. Also be sure to maintain a fun and casual atmosphere so that you have an opportunity to capture unique moments. In the examples provided (thanks to DPA students Mauricio, Stephen and Stuart) my family is posed in completely different manners. I cherish both because they portray separate facets of our family. In one, we are tightly grouped, holding each other and leaning into each other showing our close affection. Ask your subjects to relax and lean into each other with an arm or hand positioned on the person closest. It helps to encourage them, otherwise many people tend to stiffen. In the second we are hamming it up. The result is a fun pose that shows our tendency to be energetic and fun. © Michael Thoennes Remember to take multiple shots. Do not bracket the exposure because the expressions are most important. If you miss your exposure by a little this can be fixed. Closed eyes and distorted faces are not so easy. As you shoot more frames the people will loosen a bit and with more options a good outcome is more likely. Also of importance is simplicity of background. A busy background would diminish the subject. Place your group 10-12 feet from the background and fill the frame. The clothing is selected so that no one individual stands out with a red shirt for example. Some families like to dress in one style shirt. These ideas should be addressed before the shoot date. Of course if there′s a spontaneous moment to gather a family, do it. Finally, and absolutely important, a soft even light makes casually posing groups more successful. In this example we used a background light with an incident meter reading +1.5 greater than our exposure (f11), f 16.5. This insured that the background was white. Using a softbox in the foreground and a beauty dish the foreground was evenly lit for the group to pose within a block (an area marked where lighting is consistent). A good solution for those without a studio is to choose a shaded side of the house using a solid area of a wall as the background or a large hedge. Use an aperture of no less than f 8 to insure that all people are in focus and use your on camera flash as a fill light for a little sparkle and added contrast. Take lots of pictures and engage the group with encouragement. SMILE. YOU GUYS LOOK GREAT. ONE MORE. LOOK UP, ON THREE LOOK AT ME. ONE MORE. AND AGAIN. THANKS! Be fun and they′ll likely suggest a pose. Or some photographers are successful thoughtfully posing each person. Its your choice, your style.
Natural Light
© Frank SitemanSometimes turning off your flash and using the natural light provided creates a greater warmth and depth to your shot than when shooting with your flash.


