DPA Magazine
Color Temperature and White Balance, Fixes and Enhancements with NIK Software
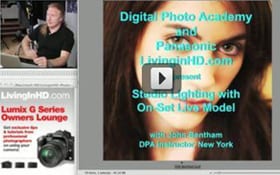
Digital Photo Academy and LivinginHD present a free monthly series of photography webinars on LivinginHD.com. Your host, John Bentham answers many questions live during the webinars. Additional questions, answers and tips are posted here on digitalphotoacademy.com where you can also view the archived webinars. White Balance: The Auto White Balance feature (AWB) of your digital camera is designed to compensate and correct for different light sources. In theory effectively correcting any color cast to neutral thus rendering white as white, gray as neutral gray etc. Auto White Balance works well in many situations but Auto White Balance is somewhat of a misnomer and should more accurately be called Average White Balance. Essentially the system mixes all the light from different color temperature light sources in a scene, jumbles them together and assigns a corrected color balance to each photograph. The Auto White balance setting will work to remove a color cast that is warm, pink or blue. Sometimes its better to try a different WB setting, such as Daylight thus maintaining a color cast that makes a photo distinctive. LCD camera screens give a pretty accurate rendition of color in a photo. By trying different WB settings as you shooting you can preview what the color will look like. Photo by John Bentham, DPA Instructor New York After experimenting with different White Balance settings in-camera Johns’ photo above was captured in Auto White Balance after finding it gave the most pleasing color temperature and soft muted color effect. Color Temperature is measured in degrees Kelvin. Kelvin is a temperature scale much like Fahrenheit or Celsius although Kelvin measures the color temperatures of wavelength of light. Its important to remember Kelvin works counter opposite and counter intuitively to the Celsius or Fahrenheit scales. In the Kelvin scale the higher temperature the cooler the light source, thus the cooler the subject it illuminates appears. IE: 5000 degrees appears a cool blue while a lower temperature of 3200 degrees appears warmer. By experimenting with the different pre-set white balance settings available in your camera you have a much better chance of capturing the correct white balance. To capture a more precise and accurate color balance you should set a Custom White Balance for each different lighting scenario. Where the whole white balance system wavers or simply falls apart is when you are shooting in mixed lighting conditions. As previously stated the camera WB system will correct white balance by averaging out the white balance in mixed light. However in some situations the system will ere towards the most predominate color temperature. If the strongest light source is a relatively cool daylight coming in through windows the camera will render a correct (often referred to as normal), white balance for daylight. If there is another light source in the scene with a completely different color balance the area of the scene illuminated by that source will appear as a much different color balance. There are a number of instances that through off color balance. Its is important to remember light can change color depending on the surfaces it is reflected off. If you bounce an electronic flash which has a color temperature of approximately 5000 K depending on the manufacturer and factors such as UV filtered flash tubes, into a red painted wall the relatively cool color temperature of the flash light source bounces back as a much redder light with a completely different, much warmer color temperature. Photo by Steve Dunwell, Boston DPA Instructor The photo above by Steve Dunwell shows a distinct warm, rosy violet color cast which technically could be considered incorrect however that is precisely what makes it appealing. This is where NIK Software can help, quickly and painlessly. Using NIK Viveza Software and applying carefully placed Control Points you can easily correct and remove incorrect color casts in select specific portions of a photograph. NIK works as a Plug-In for Photoshop, Aperture or Lightroom. The software is great for this and I find it works much faster than Photoshop alone for this type of correction. NIK Software coupled with Photoshop is a great color correction system especially when shooting in mixed light conditions. Alternatively you can also apply NIK Viveza Software to intentionally alter the color of an image when you desire a more creative technique. Basic adjustments such as warming filters, brightness and contrast controls can be adjusted globally or specifically to areas of interest the photographer wishes to enhance. For additional filters NIK Color Efex Pro offers a number of preset filters and color effects which can easily be applied with a click. Following is a list of the color temperature in degrees Kelvin of many of the most common light sources. The Cooler, higher temperatures (Blue) are at the top of the list, as you move down the list the temperatures move towards the warmer (Red) temperatures. Cooler Colors - Blue Blue Sky: 12,000 - 20,000 Average Summer Shade: 8000 Light Summer Shade: 7100 Typical Summer Light. Illumination from both sun and sky: 6500 Daylight Fluorescent: 6300 Overcast Sky: 6000 Clear Mercury Lamp: 5900 Sunlight - Noon, summer, mid-latitudes: 5400 Design White Fluorescent: 5200 Daylight Photoflood: 4800 - 5000 Sunlight - Early morning and late afternoon: 4300 Brite White Deluxe Mercury Lamp: 4000 Sunlight - Sunrise 1 hour after dawn: 3500 Cool White Fluorescent: 3400 Photoflood: 3400 Professional Tungsten Photographic Lights: 3200 100-Watt Tungsten Halogen: 3000 Deluxe Warm White Fluorescent: 2950 100-Watt Incandescent: 2870 40-Watt Incandescent: 2500 Sunlight - Sunrise or Sunset: 2000 Candle Flame: 1850 - 1900 Warmer Colors - Moving towards Orange and Red
Bringing out Reflections with NIK Software
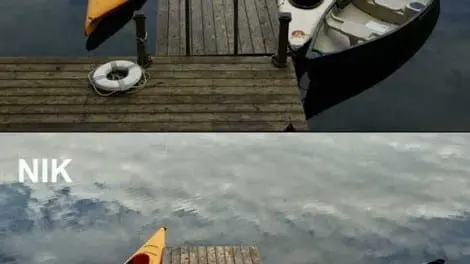
Digital Photo Academy and LivinginHD present a free monthly series of photography webinars on LivinginHD.com. Your host, John Bentham answers many questions live during the webinars. Additional questions, answers and tips are posted here on digitalphotoacademy.com where you can also view the archived webinars. Photos by John Bentham, DPA Instructor New York This series of images illustrates a step-by-step look at image enhancement of a water photo by John Bentham. In the original above the reflections of the clouds in the water are muted and undefined, they need a little work to bring them out and make them pop. Initially John has made a Global Adjustment to the image, adding overall structure which gives edges definition and detail. Using NIK Viveza 2 software you can selectively apply change to increase the saturation and contrast of an image and control the density (lightness and brightness) when you desire a more creative technique. Basic adjustments such as warming filters, brightness and contrast controls can be adjusted globally or specifically to areas of interest the photographer wishes to enhance. In the step above John has dropped three control points in the water areas of the photo. The use of control points enables you to select areas based on color and texture cutting down the time required to manually demark or paint areas that need correction. In the next step two control points have been placed on the dock to reduce the green color cast evident in the wood, making it appear warmer, closer to a natural wood color. In the over, under comparison above you see the results of the NIK Software. The cloud reflections are sharp, punchy and with some bite becoming an integral part of the photo instead of simply appearing as background. For additional filters NIK Color Efex Pro offers a number of preset filters and color effects which can easily be applied with a single click, or then further adjusted to your liking.
Using Bounced Light in Food Photographs
© Michael Steinberg This shot was taken at a wedding reception by a Nikon 70-200 vr2 camera with a sb900 flash bounced from the left side off the ceiling as the main light with a bounce from a sb900 flash set to exposure compensation of -2 stop on camera. taken at a wedding reception. Colors were emphisized in Nik Color Effex Pro and contrast was added.
Help with Apertures
© Kathy Tarantola The three tiered non-traditional wedding cake was decorated for a California style beach wedding, and I loved the way it was decorated. Even at f4 I had enough depth of field to keep the cake layers in focus, but soften the background enough not to distract the subject. The slight overexposure of the back light creates a bit of flare to give the impression of skylight, even though the reception was indoors - in a dark paneled room! © Kathy Tarantola This beautiful plate of fruit only survived enough for a couple of shots before I devoured it! I wanted to accentuate the colors of the fruit, so I used a shallow depth of field - f 5.6.. To bring the viewer′s eye to the foreground. Yum! This was after a sunrise shoot and swim at the beach at Hanalei Bay, Kauai, so it was as delicious as it looks!
Create a Scene with Your Food Photographs
© Michael Hart Birds eye view works for desserts but an image that employs depth of field can be effective too! Create an impressionistic sensibility of the denouement of an unforgettable feast by posing the main dish in the foreground and variations of the theme, platters vases decanters and the likes in the background.
Accessorizing your Food on Site
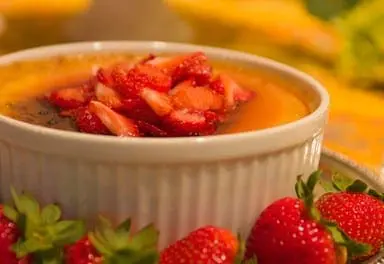
©Michael Hart Shiny silverware and a flower arrangement can help to make any dessert item fit for a magazine cover. This tiramisu is even more eye catching thanks to its border of strawberries and the color of the pudding itself is enhanced against the table cloth of a similar shade. The birds eye view makes you want to dive right in! ©Michael Hart ©Michael Hart
Accessorize your Desserts
© Michael Hart Don′t forget to accessorize your desserts! Pick a complimentary color to the chocolate or a hue that′s consistent with the icing and surround the dessert with items accordingly. In this case Houston DPA instructor Michael hart chose rose petals and laid them out in a circular fashion to bring the viewer′s line of focus back to the main event while simultaneously repeating the circular patterns. Or you can choose to keep it simple with a placemat. © Michael Hart
Color Management Webinar with Datacolor′s Josh Fischer and DPA Instructor Rick Gerrity
Datacolor′s Education Manager and Color Management Guru Josh Fischer, along with DPA Instructor Rick Gerrity, take you through the entire process of color management from Shoot to Edit to Print to show you how to get the colors you want out of your entire photography process.

