DPA Magazine
Tip on Photographing the Hudson River
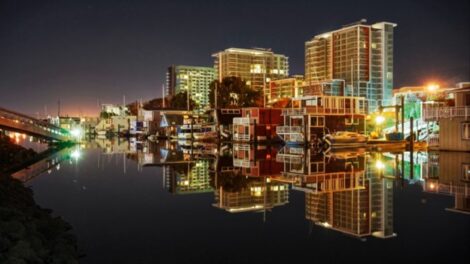
That photo was taken during the Sunday workshop and Long Dock Park. It was just a grab shot since I rarely shoot during a workshop. 24mm on full frame Nikon D810 camera, 0.6 second exposure at F18. Shutter speed was important to render the water texture just right, so shutter speed of 0.6 seconds was chosen, then F18 was chosen to render a good exposure. Exposure was intentionally 1 stop less than the meter reading. The camera meter wants to render the scene a middle gray, but at this time of day, the scene is darker than middle gray. Using the exposure meter’s setting would have caused the photo to be too bright. Story 1: The chap who sails this boat swims to and from it from shore. Note that the water temperature on April is still quite chilly. Story 2: Most photographers go to Long Dock Park at low tide to shoot the pilings in the river that are visible at low tide. This beautiful view south towards the Hudson Highlands near high tide is rarely photographed.
BEAUTY IN THE EYE
BEAUTY IN THE EYE-Orlando Camera Club had a "Creative Macro" competition with results being presented this past Monday and David Montague walked away with the first place in this particular category. Says he, "I shoot with a Nikon D750 and used my 105mm macro lens. I placed my son in a chair, underneath the lanai shade, and his wife more in the sun so she would show up better within his eye. Placed the camera on a tripod and positioned it within a few inches of his eye. Took quite a few shots to get the focus just right. As your aware, using a macro lens that tight is tough to get a sharp image unless everything is perfectly still."
Phone Apps Can Help You Create Great Effects With Your Phone
The photo is two images…the location of the moon rise while we were at Church Street Station was over a high-rise apartment building. So, we hoofed it to Lake Eola. To get it into position near the fountain wasn’t happening, and to get the exposure right for both wasn’t going to happen either. So, I shot the moon and fountain separately with this double exposure in mind. Attached is the picture straight out of the camera. ISO 100, 1/80, f/11 Canon 100-400L @ 400mm. Note that I used a simple app called PicBender; it just puts one picture on top of the other. Photoshop requires many more steps. John Cullum, Jr., Orlando DPA Instructor
A-Z Live Shoot, Critique, Work Flow Session–$120
February 20, 2016 - February 20, 2016 | Register Description: Register
Critique from Harry Wendt of Mylio.com and Digital Photo Academy Team-Sarah Corbin – “Galloping through the Marsh”
"Galloping Through the Marsh" taken in the Camargue, France. Copyright 2011 Sarah Corbin You’ve made a lot of really nice decisions here, Sarah. First, we like the sepia tone. We were wondering if you chose to shoot in monochrome or if it was a post-process choice. A lot of pros will tell you to make the choice in the camera to shoot monochrome, instead of it being a computer edit. You’ve done a great job of capturing these wild horses in their own world. Composition-wise, there really are no suggestions for you here. This is a really nicely layered image with the water in the foreground, the horses and splashing water in the mid, and the reeds and trees in the background, all which bring our eyes back to the subject. Geographically, we would advise you that there are still wild horse and pony herds in Tonto National Park, near Saguaro Lake in Arizona (though these are going to be relocated), and along the Outer Banks of North Carolina. Artistically, we would recommend you look up Robert Farber and Bobbie Goodrich, both of whom photograph wild horses. You might also be interested in the work of Paul Caponigro, who shot wild white deer. He was born in 1932, and a world renown master shooter and father of accomplished photographer, John Pajul Caponigro. The high shutter speed and 5.6 f-stop are both great technical choices. The shutter speed is going to stop the action of the horses and water splashing. The 5.6 aperture is enough to keep your subjects within your depth of field, but keep your foreground and background out of focus. My suggestions on technique would be that if you shoot a little lower shutter speed (anything over 1/1000s should stop the action) you could lower your ISO, increasing image quality and decreasing noise (not that any noise is seen here, just a note). We looked at your other images on your site and see that you make good post-production choices. We also liked the profile picture of the horses that we saw. We were wondering if you used a brush (Mylio will have brushes as of Monday) to burn in the background behind the horses a little? If so, was it a conscious choice to leave some shadow in the bushes immediately surrounding the horses to help them stand out, or was that just a lucky coincidence? Either way, it really helps the white horses pop out of the background.
How to color
From Don Peters/ DPA instructor in Chicago To view more of his images please visit http://digitalphotoacademy.com/portfolio/donald-peters/ My mantra, as I teach Composition in the Field Classes for DPA, is to look for building blocks of composition ---color, shape, texture, pattern, line, form….etc. This in-studio composition of a simple array of colored pencils gave me an opportunity to explore several of these elements. Using two, Kenko extension tubes, mounted between my tripod mounted camera and lens, I was able to focus very closely on my composition of the pencil tips to bring out the detail of the shaved wood. Using a goose-neck desk lamp was all the illumination needed and I was able to move the lamp around to try various pleasing light angles to create shadow and best show off the texture of the pencil tips. Because the bulb was incandescent, I adjusted the white balance setting in my camera accordingly to overcome the “yellow” cast of the bulb to make the subject’s colors appear more natural. Finally, I arranged the pencils in tight rows pointing at one another to add an element of “tension” to the composition. (Nikon D300 on tripod with 100mm Tamron macro lens and two, Kenko extension tubes, ISO 200, 1/125, f/16, side lit with desk lamp.)
Hot air balloons
From Don Peters/ DPA instructor in Chicago To view more of his images please visit http://digitalphotoacademy.com/portfolio/donald-peters/ Hot air balloons are undeniably colorful (and shapely) subjects to photograph, but in the light just minutes after dawn they looked flat against the still dark background. I was able to solve the problem again by using HDR, taking a rapid series of 5 shots, with in-camera adjusted apertures, to gain a much broader range of light than would be achieved with a single exposure. The final result was an image much brighter and more vibrant than what I saw through the viewfinder of my camera. Often, especially in landscape photography, I’ll make shots in both “normal” and HDR and later review the results to decide which is most compelling. (Nikon D300 (on tripod) with 18-200mm Nikkor lens at 18mm, ISO 400, 1/250, 5 exposures bracketed +/ .7 f stop, then post processed in Photomatix).
Yielding Lightness with darkness
From Don Peters/ DPA instructor in Chicago To view more of his images please visit http://digitalphotoacademy.com/portfolio/donald-peters/ Nothing says “old and elegant” more than Charleston, S.C. in the springtime. This Southern church yard seemed to want to communicate that, but I felt something more was needed. So, I made an “HDR” image, using the menu setting on my Nikon to capture 5, rapid fire images at slightly different apertures. This enabled me, with the use of post processing (Photomatix) software, to produce a “tonemapped” image, yielding a much broader range to the image, capturing the extremes of the lightness of the flowers and the darkness of the tombstones and surrounding shadows. . (Nikon D300 (handheld) with 18-200mm Nikkor lens at 100mm, ISO 400, 1/500, 5 exposures bracketed +/ .7 f stop, then post processed in Photomatix).